1
This article is just
that, my way of getting along with
boredom... if it helps someone else, or
fills his spare time, my joy will only be
greater.
2
I don't know if you
are in a club, but I've met numerous
.NET
developers who had much trouble with
choosing the right tool to build reports.
Apart from praise for the Access report
building capabilities, you won't hear many
compliments for the reporting tools.
I guess we have all
tried Crystal Reports embedded into Visual
Studio .NET
- they are OK, but are demanding. And often,
small bugs, along with ridiculous option
placements, will drive you nuts.
SQL Reporting
Services are somewhat a new option that is
praised all over the web by Microsoft
evangelists. In practice, however, I've
often stumbled on projects where the team is
paralyzed with problems concerning
configuration and specific aspects of report
writing.
Finally, there are
numerous custom reporting frameworks such as
ActiveReports or DevExpress' (I love
these guys)
Reporting Tools.
Specific maladies
aside, the common problem with all the
previously laid options is that they have a
modest learning curve. I'm not talking about
the time needed to acquire the knowledge for
generating a list of employees from an "It's
easy to use our report suite"™ example. I'm
talking about the time needed to acquire the
knowledge for developing real-life reports
which have three tables that properly expand
and contract (along with its columns and
rows) over pages.
Also, none of these
options provide you with the solution for
frequent user requirements – when a report
is rendered, it should be possible to modify
it a bit. The workaround is to use report
exporting to popular formats that are known
to most users, like Word.
As I've experienced,
this is the point when the bulb shines above
the head of the developer and the idea comes
- why not generate
reports in
Word in the first place. In
the majority of projects, clients are
provided with the needed output
reports
in Word
format,
which they print and fill by hand. And if
not... well, you have one of the best "report
designers" in the world, as it was tweaked
and improved over numerous versions.
So, how to do it?
3
One big, big problem
with Word documents before the 2003 version
was their binary format. Word's file format
was not publicly available, and all
utilities that could parse it were mostly
developed by reverse-engineering, or by
stealing using
documentation available to Microsoft
partners. You can guess that results weren't
too satisfying...
However, in 2003,
Microsoft introduced XML formats for storing
Office documents. Those formats were
succeeded by Office Open XML formats in
Office 2007 (which are default, instead of
their binary counterparts), so you can
safely bet that they are here to stay.
So, in order to
generate
a Word
file now, you basically need to apply the
appropriate XSLT (XSL Transform) onto the
XML data used in a report. This process can
be divided into several operational steps:
- Defining the
XML schema based on the report
- Binding data
from the Word
document to the appropriate
fields in XML schema
- Saving the
Word document
in WordML format and the
generation
of XSLT using the
WML2XSLT tool
- Retrieving the
needed data from a source (mostly a SQL
Server database), it's structuring into
appropriate XML
- Applying XSLT
onto XML data in order to
generate
the Word
document, which then can be
further manipulated (sending over wire,
displaying to user, and similar)
The biggest problem
is to produce valid XSLT; from five steps,
three are taken to do that. The generation
of XML is far easier, while the
transformation is completely trivial.
4
Defining the XML
schema based on the report
In order to start
making the report, it is required to define
the necessary data. A picture talks more
than a thousand words, an example talks
almost an equal amount... so let's look at
the picture of the report that we'll use as
an example:

Figure 1 – Report
that should be generated
It is obvious that
we first have the buyer's name, the document
date follows. Then we have, from the
developer point of view, an interesting
table of invoice items... and so on. The
structure of the XML which will hold this
data is described using an XML schema.
Visual Studio 2005 has nice support for
visual design of schemas, which we will
utilize – after starting the IDE, take
option File –> New –> File (CTRL+N): this
gives a list of possible document types from
which we choose XML Schema.
An
element
from the Toolbox should then be
dragged-and-dropped on the workspace and
filled with content. This process is shown
on the picture that follows:

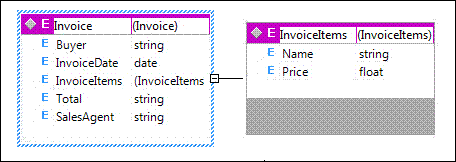
Figure 2 – Schema
that defines the structure of data for
the report
In order to be
properly mapped, items on the invoice need
to be described as child elements of the
Invoice
entity. Add -> New element from the context
menu shown after right click gives the
option to perform this action.

Figure 3 – Adding a
child to the Invoice entity
Adding the rest of
the elements, assigning types to variables,
and setting the
targetNamespace
(in the Properties window) gets the job
done.
Assigning types to
variables is optional in most cases – if you
use special formats for printing out
documents (like dd.MM.yyyy) or monetary
values ($10.99), it's easier to leave
everything in the schema in string type, and
do the formatting and validation during the
generation of XML with the data.
On the other hand,
setting the
targetNamespace
shouldn't be optional – the produced schema
will get the default value
http://tempuri.org/XMLSchema.xsd. We
can put aside the rules of good practice
that tells us not to use the
http://tempuri.org/ namespace in
production; but, if you don't give unique
names to your schemas, you'll stumble into
problems during import and usage – Word's
schema library can't hold two different
schemas with the same namespace. So, be sure
to set the
targetNamespace
(the convention
http://Organization/Project/SchemaName.xsd
is used mostly) before you close the
definition.

Figure 4 –
Resulting XML schema
Binding data from the
Word document
to the appropriate fields in the XML schema
Schema importing is
performed by using the XML Structure dialog.
In the 2003 version of Office Word, this
dialog is accessible through Tucancode.net Pane
(CTRL+F1); it should be chosen from the list
shown when clicked on the triangle in the
header (left from the small x). If schemas
aren't previously imported, and the Template
and Add-Ins option is chosen, the picture
that follows will faithfully resemble the
resulting state of the screen.

Figure 5 – Adding
the new XML schema in the Word document
In the dialog shown
after clicking on the Add Schema button, it
is needed to point to the location of the
defined XML schema. Its fields will be then
shown in the XML Structure dialog, from
where they are further bound to the document
data. Before starting that sweet job, some
additional options should be set:
- Check
Ignore mixed content – This allows
mixing data from the XML with data from
the document. As documents are almost
always made of fixed and variable parts,
this avoids frequent signalization by
Word
that between the data defined in the XML
schema there are "some others that don't
belong there".
- Check Show
advanced XML error messages –
Choosing developer-friendly messages
over user-friendly ones.
- Check Allow
saving as XML even if not valid –
Most often, you just can't "validly"
mark data in the report document. For
example, if some data from the XML is
used twice in the document, Word will
signal error in validation because
according to the XML schema, that data
appears only once. The same problem
happens with order.
This is present
to force valid entry of data in the
Word document
(another application of the
technique that is being described).
However, our current goal is
diametrically opposite – we are not
marking fields for entry, but for space
in which data from the XML will be
inserted, so it's not needed to force a
unique appearance and order.

Figure 6 – Dialog
for setting XML data
After the schema is
imported in to the
document and the options set,
it's time to move onto binding the schema
and the data. Initially, only the root
element (in our case,
Invoice)
is available. After choosing it,
Word
will offer options for assigning the schema
to the appropriate range in the
document.

Figure 7 – Options
for applying the schema on the
appropriate range in the
document
In this example,
applying the schema to the entire document
is a needed option (possible multi-schematic
Word
files
aren't interesting from the reporting point
of view). Now, what is left is to mark the
data – the selected text is bound to the
schema either by choosing the field from the
Tucancode.net Pane, or by using the option Apply
XML Element shown after a right click.

Figure 8 – Binding
data from a
Word document to fields of
the XML schema
Two things are
interesting here. First, to define child
items, you need to select and map the whole
row in the table to the
InvoiceItems
element, after which
Name
and Price
will be available for bounding to the cell's
data. If the
document contains a large number
of items, there is no need to map every
single row; mapping just the first row is
fine, the rest can be deleted. The structure
of report, not the content, is what matters
at the moment.
Second,
Word,
for previously explained reasons, signals
error for double usage of the
Buyer
element (look at the picture). It'll cause
problems later, during the generation of the
XSLT, but we can omit that problem for now
(if Allow saving as XML even if not
valid is checked in the XML options).
Saving into WordML
and the generation of XSLT
The marked
document
contains all the data needed for the
generation of valid XSLT. The
WML2XSLT tool accepts WordML as input,
so it's required to save the
Word document
in this format. You can do this by using the
Save As option from the File
menu – when the dialog is shown in Save
as Type, choose XML document
(*.xml). The option Apply transform
is used in the opposite direction, Data
only when XML data is fetched from the
document, so both fields should be left
unchecked.
The prepared WML
file is processed using this statement in
the Command Prompt (the following is valid
assuming that everything is in the same
directory):
 Collapse |
Copy Code
WML2XSLT.exe "WordGeneratedInvoice.xml" –o "WordGeneratedInvoice.xslt"
In case you run into
problems (FileNotFoundException)
while using the WML2XSLT.exe packed
with the article source, be sure to download
the tool from the previously given link and
perform the installation (as mobfigr noted
in
his comment).
Solving problems
with multiple used elements
The generated XSL
transform will almost always be satisfying.
One exception is when an element from the
XML with data is used multiple times. In the
example we are developing, the
Buyer
element is used twice, and for its second
appearance, the following will be generated
(you need to open the XSLT in Notepad or
Visual Studio .NET and search for the value
ns1:Buyer):
 Collapse |
Copy Code
<w:r> <w:t><xsl:text>(Buyer: </xsl:text></w:t></w:r>
<xsl:apply-templates select="ns1:Buyer[position() >= 2]" />
<w:r> <w:t><xsl:text>)</xsl:text></w:t></w:r>
It's obvious we
aren't interested in the element
Buyer
on the second position, but the same one
that is referenced earlier in the file.
Because of that, the following correction
should be made:
 Collapse |
Copy Code
<w:r> <w:t><xsl:text>(Buyer: </xsl:text></w:t></w:r>
<xsl:apply-templates select="ns1:Buyer" />
<w:r> <w:t><xsl:text>)</xsl:text></w:t></w:r>
Inserting images into
the document
Naturally, WordML
has good support for images, but it is very
poorly documented. So, in order to see how
images are represented in WML format, we'll
perform a little experiment and save the
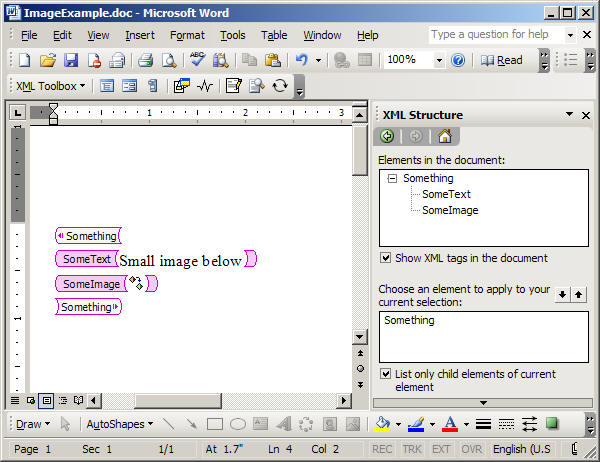
marked Word document displayed below as XML:

Figure 9 – Document
with image
After processing the
saved document using the WML2XML tool (with
the WML2XML ExampleImage.xml -o
ExampleImage.xslt command), and opening
the generated XSLT file, we can scroll to
the
SomeImage
tag and see the following:
 Collapse |
Copy Code
<ns0:SomeImage>
  <xsl:for-each select="@ns0:*|@*[namespace-uri()='']">
    <xsl:attribute name="{name()}" namespace="{namespace-uri()}">
      <xsl:value-of select="." />
    </xsl:attribute>
  </xsl:for-each>
  <w:r>
    <w:pict>
      <v:shapetype id="_x0000_t75" coordsize="21600,21600" o:spt="75"
              o:preferrelative="t" path="m@4@5l@4@11@9@11@9@5xe" filled="f" stroked="f">
        <v:stroke joinstyle="miter" />
        <v:formulas>
          <v:f eqn="if lineDrawn pixelLineWidth 0" />
          <v:f eqn="sum @0 1 0" />
          <v:f eqn="sum 0 0 @1" />
          <v:f eqn="prod @2 1 2" />
          <v:f eqn="prod @3 21600 pixelWidth" />
          <v:f eqn="prod @3 21600 pixelHeight" />
          <v:f eqn="sum @0 0 1" />
          <v:f eqn="prod @6 1 2" />
          <v:f eqn="prod @7 21600 pixelWidth" />
          <v:f eqn="sum @8 21600 0" />
          <v:f eqn="prod @7 21600 pixelHeight" />
          <v:f eqn="sum @10 21600 0" />
        </v:formulas>
        <v:path o:extrusionok="f" gradientshapeok="t" o:connecttype="rect" />
        <o:lock v:ext="edit" aspectratio="t" />
      </v:shapetype>
      <w:binData w:name="wordml://01000001.gif">R0lGODlhEAAQAPIGAAAAAAAAsACwALAAALD/sP+wsP
   ///////yH5BAEAAAcALAAAAAAQABAAAAOW
eHd3h3d3d3h3d4d3cHd4d3eHd3cHWHAXgXF3d3gHVYNwZxZ4d3eAVTUDeHdhh3d3UFgDdocRcXd4
d1CAdncXaHZ3h3dgd3h3Z4d3d3d4d3eHB3d3eHd3h3d3QAh3d4d3d3d4QCSAd3d3eHcHhEQicHh3
d4d3B0QoYHeHd3d3eAcEhnd3d3h3d4cHdnd4d3eHd3d3eHeXADu=
</w:binData>
      <v:shape id="_x0000_i1025" type="#_x0000_t75" style="width:12pt;height:12pt">
        <v:imagedata src="wordml://01000001.gif" o:title="convert" />
      </v:shape>
    </w:pict>
  </w:r>
  <w:p>
    <w:r>
      <w:t>
        <xsl:value-of select="." />
      </w:t>
    </w:r>
  </w:p>
</ns0:SomeImage>
Obviously, the image
is Base64 encoded into the XML file between
the
<w:binData>
tags. After that, we have the
<v:shape>
tag which defines the placing of the image
and references the encoded binary data by
using
<v:imagedata>.
All this is preceded by
<v:shapetype>,
which is (luckily) optional and can be
removed. Now, when we have some
understanding of the format, we can perform
a little clean up and properly place
xsl:value-of select,
so that binary data comes from our XML file:
 Collapse |
Copy Code
<ns0:SomeImage>
  <xsl:for-each select="@ns0:*|@*[namespace-uri()='']">
    <xsl:attribute name="{name()}" namespace="{namespace-uri()}">
      <xsl:value-of select="." />
    </xsl:attribute>
  </xsl:for-each>
  <w:r>
    <w:pict>
      <w:binData w:name="wordml://01000001.gif"><xsl:value-of select="." /></w:binData>
      <v:shape id="_x0000_i1025" type="#_x0000_t75" style="width:12pt;height:12pt">
        <v:imagedata src="wordml://01000001.gif" o:title="convert" />
      </v:shape>
    </w:pict>
  </w:r>
</ns0:SomeImage>
It looks better,
doesn't it? All that is left is to supply
the XML data in the proper format:
 Collapse |
Copy Code
="1.0" ="utf-8"
<Something xmlns="http://schemas.microsoft.com/GeneratingWordDocuments/ImageExample.xsd">
<SomeText>Small image below</SomeText>
<SomeImage>R0lGODlhE[-- binary data truncated --]3d3eHeXADu=</SomeImage>
</Something>
and we'll have the
document from Figure 9 in no time. One final
word of warning - if your images aren't
always the same size, you'll want to check
the style
attribute of the
<v:shape>
tag. And, after checking, you'll probably
want to move it out of the transformation
into XML ;). Here is how to do that:
 Collapse |
Copy Code
<w:pict>
<w:binData w:name="wordml://01000001.gif">
<xsl:value-of select="." />
</w:binData>
<v:shape id="_x0000_i1025" type="#_x0000_t75">
<xsl:attribute name="style">
<xsl:value-of select="@style"/>
</xsl:attribute>
<v:imagedata src="wordml://01000001.gif" o:title="convert" />
</v:shape>
</w:pict>
="1.0" ="utf-8"
<Something xmlns="http://schemas.microsoft.com/GeneratingWordDocuments/ImageExample.xsd">
<SomeText>Small image below</SomeText>
<SomeImage style="width:24pt;height:24pt">R0lGOD[-- binary data truncated --]3d3eADu=
</SomeImage>
</Something>
Opening the
document in
read-only mode
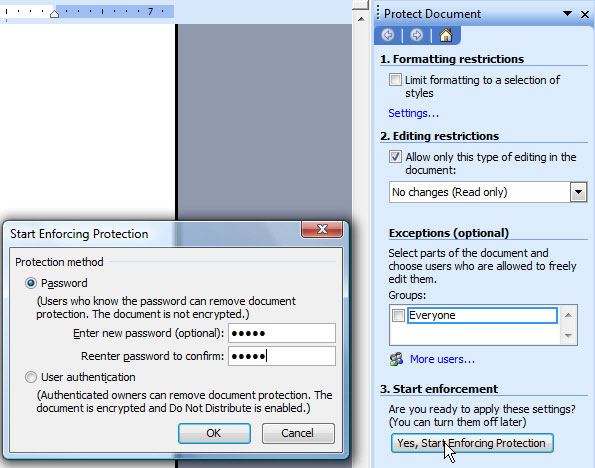
To force opening the
report in read-only mode when the report is
displayed to the user, it's needed to use
the Tools -> Options -> Security -> Protect
Document option during the document
creation. Under Editing Restrictions, 'No
changes (Read only)' should be chosen...
after that, the only thing left to do is
click onto 'Yes, Start Enforcing Protection'
and enter the password for protection. Of
course, further steps remain the same - the
document
is saved as WordML, processed through the
WML2XSLT tool...

Figure 10 –
Settings for the read-only mode
Do not expect too
much from this "protection". In WordML
format, it's enforced by one line in the
DocumentProperties
element:
 Collapse |
Copy Code
  <w:docPr>
    <w:view w:val="print" />
    <w:zoom w:percent="85" />
    <w:doNotEmbedSystemFonts />
    <w:proofState w:spelling="clean" w:grammar="clean" />
    <w:attachedTemplate w:val="" />
    <u><w:documentProtection w:edit="read-only" w:enforcement="on"
                             w:unprotectPassword="4560CA9C" /></u>
    <w:defaultTabStop w:val="720" />
    <w:punctuationKerning />
    <w:characterSpacingControl w:val="DontCompress" />
    <w:optimizeForBrowser />
    <w:validateAgainstSchema />
    <w:saveInvalidXML />
    <w:ignoreMixedContent />
    <w:alwaysShowPlaceholderText w:val="off" />
    <w:compat>
      <w:breakWrappedTables />
      <w:snapToGridInCell />
      <w:wrapTextWithPunct />
      <w:useAsianBreakRules />
      <w:dontGrowAutofit />
    </w:compat>
    <w:showXMLTags w:val="off" />
  </w:docPr>
This means that the
read-only mode can be easily incorporated
into XSLT for reports you've already done...
but, it also means that anyone knowing WML
format can easily workaround your
"protection". So, use it wisely :)
5
T-SQL and XML
XML data that
satisfies the previously defined schema and
which we'll use in the report can be
generated in many ways. The most commonly
used is the one that utilizes the
SELECT... FOR XML
command and data from SQL Server 2005 that
directly translates into XML.
SELECT... FOR XML
has two parameters:
- Work mode,
chosen from
RAW,
AUTO,
EXPLICIT,
and the
PATH
array. In general, the
AUTO
mode will finish the job; when extra
formatting is needed, the
PATH
mode is the choice.
- Additional
variables like
ROOT
(add a
root
tag to XML),
ELEMENTS
(format output data as elements),
TYPE
(result is returned as
XML
type of SQL Server 2005), and
XMLSCHEMA
(write XML schema before data).
For example, if
there is a c_City table with
columns
CityId
and
CityName,
and XML with element
City
is needed, the following T-SQL is required:
 Collapse |
Copy Code
SELECT CityId, CityName FROM c_City AS City
FOR XML AUTO

<City CityId="43" CityName="100 Mile House" />
<City CityId="53" CityName="Abbotsford" />
If it's needed to
write out data in elements, the
ELEMENTS
directive is added:
 Collapse |
Copy Code
SELECT CityId, CityName FROM c_City AS City
FOR XML AUTO, ELEMENTS

<City>
  <CityId>43</CityId>
  <CityName>100 Mile House</CityName>
</City>
<City>
  <CityId>53</CityId>
  <CityName>Abbotsford</CityName>
</City>
As two elements
exist on the first level,
Root
tag must be added so that the XML is
syntactically valid:
 Collapse |
Copy Code
SELECT CityId, CityName FROM c_City AS City
FOR XML AUTO, ELEMENTS, ROOT('Root')

<Root>
  <City>
    <CityId>43</CityId>
    <CityName>100 Mile House</CityName>
  </City>
  <City>
    <CityId>53</CityId>
    <CityName>Abbotsford</CityName>
  </City>
</Root>
Let's assume that
there is a c_PostalCode table with
postal codes used in cities. If it's
required to make XML where postal codes will
be child element of cities, the following
SQL is in order:
 Collapse |
Copy Code
SELECT CityId, CityName,
    (SELECT PostalCodeId, PostalCodeName FROM c_PostalCode
     WHERE CityId = City.CityId
     FOR XML AUTO, TYPE)
FROM c_City AS City
FOR XML AUTO, TYPE

<Root>
  <City CityId="43" CityName="100 Mile House">
    <c_PostalCode PostalCodeId="317701" PostalCodeName="V0K2Z0" />
    <c_PostalCode PostalCodeId="317702" PostalCodeName="V0K2E0" />
  </City>
  <City CityId="53" CityName="Abbotsford">
    <c_PostalCode PostalCodeId="317703" PostalCodeName="V3G2J3" />
  </City>
</Root>
If more output
flexibility is required, it's possible to
format the XML in more detail using the
PATH
mode. For example, if it's needed to hold
CityId
as an attribute,
CityName
as an element, and information about postal
codes as child elements which
PostalCodeId
places in the
NotNeeded
sub element, use this T-SQL:
 Collapse |
Copy Code
SELECT CityId AS '@CityId', CityName,
    (SELECT PostalCodeId AS 'NotNeeded/PostalCodeId', PostalCodeName
     FROM c_PostalCode
     WHERE CityId = City.CityId
     FOR XML path('PostalCode'), TYPE)
FROM c_City AS City
FOR XML PATH('CityRow'), type, root('Data')

<Data>
  <CityRow CityId="43">
    <CityName>100 Mile House</CityName>
    <PostalCode PostalCodeName="V0K2Z0">
      <NotNeeded>
        <PostalCodeId>317701</PostalCodeId>
      </NotNeeded>
    </PostalCode>
    <PostalCode PostalCodeName="V0K2E0">
      <NotNeeded>
        <PostalCodeId>317702</PostalCodeId>
      </NotNeeded>
    </PostalCode>
  </CityRow>
  <CityRow CityId="53">
    <CityName>Abbotsford</CityName>
    <PostalCode PostalCodeName="V3G2J3">
      <NotNeeded>
        <PostalCodeId>317703</PostalCodeId>
      </NotNeeded>
    </PostalCode>
  </CityRow>
</Data>
Binding XML to schema
For the XML data to
be shown in Word, it's necessary that the
xmlns
attribute of the root tag points to the
appropriate schema. To be precise – in our
example, to show the XML data in the
generated Word document, it's not enough to
provide just the following output from SQL:
 Collapse |
Copy Code
SELECT Buyer, InvoiceDate, ...
FROM Invoice
FOR XML PATH('Invoice'), ELEMENTS

<Invoice>
    <Buyer>John Doe</Buyer>
    <InvoiceDate>2008-01-01</InvoiceDate>
    ...
</Invoice>
It's needed to set
the xmlns
attribute in such a manner to point to the
targetNamespace
of the WordGeneratedInvoice.xsd
schema:
 Collapse |
Copy Code
WITH XMLNAMESPACES(DEFAULT
   'http://schemas.microsoft.com/GeneratingWordDocuments/WordGeneratedInvoice.xsd')
SELECT Buyer, InvoiceDate, ...
FROM Invoice
FOR XML PATH('Invoice'), ELEMENTS

<Data xmlns="http://schemas.microsoft.com/GeneratingWordDocuments/WordGeneratedInvoice.xsd">
    <Buyer>John Doe</Buyer>
    <InvoiceDate>2008-01-01</InvoiceDate>
    ...
</Invoice>
A blank
Word document
is the most common result if the XML data is
not bound to the schema over an
xmlns
attribute.
6
 Collapse |
Copy Code
public static byte[] GetWord(XmlReader xmlData, XmlReader xslt)
{
    XslCompiledTransform xslt = new XslCompiledTransform();
    XsltArgumentList args = new XsltArgumentList();

    using (MemoryStream swResult = new MemoryStream())
    {
        xslt.Load(xslt);
        xslt.Transform(xmlData, args, swResult);

        return swResult.ToArray();
    }
}
It's mentioned
earlier that this step is trivial. The
example justifies that, doesn't it?
After the XML data
and the XSL transformation are passed as
XmlReader
objects, an
XslCompiledTransform
is initialized through the
Load
method. All that is left is to call
Transform
to finish the job.
7
In case you don't
need advanced capabilities that
Word
provides (page numbering, margins, and
similar), you have a pretty handy option of
hand-writing XSLT that transforms XML data
to HTML and then just opens HTML in Word.
To illustrate the
idea with an example – here is an XSLT that
I use for a list report that just shows the
contents of a CD
DataTable
with two columns,
Title
and Price:
 Collapse |
Copy Code
='1.0' ='UTF-8'
<xsl:stylesheet xmlns:xsl='http://www.w3.org/1999/XSL/Transform' version='1.0'
xmlns:fo='http://www.w3.org/1999/XSL/Format'
xmlns:fn='http://www.w3.org/2003/11/xpath-functions'
xmlns:xf='http://www.w3.org/2002/08/xquery-functions'>
<xsl:template match='/'>
<html>
<body>
<h2>Report Header</h2>
<table border='0' width='100%'>
<tr bgcolor='Gray'>
<th align='left'>Title</th>
<th align='left'>Price</th>
</tr>
<xsl:for-each select='DocumentElement/Cd'>
<tr>
<td>
<xsl:value-of select='Title'/>
</td>
<td>
<xsl:value-of select='Price'/>
</td>
</tr>
</xsl:for-each>
</table>
</body>
</html>
</xsl:template>
</xsl:stylesheet>
The XML data which
is transformed:
 Collapse |
Copy Code
='1.0' ='UTF-8'
<DocumentElement>
<Cd>
<Title>Mike</Title>
<Price>20$</Price>
</Cd>
<Cd>
<Title>Nike</Title>
<Price>30$</Price>
</Cd>
<Cd>
<Title>Reebok</Title>
<Price>40$</Price>
</Cd>
</DocumentElement>
When the
xsl:template
tag is matched (and it'll be matched always
because it points to root), its
InnerText
is evaluated. The
xsl:for-each
tag processes each of the
DocumentElement/Cd
nodes, and
xsl:value-of
gets the
InnerText
of the XPath selected element. In case
you're not too good with XSLT, I recommend
this webpage:
W3Schools. W3Schools, you rock! :)
Resulting HTML:
 Collapse |
Copy Code
<html xmlns:fo="http://www.w3.org/1999/XSL/Format"
xmlns:fn="http://www.w3.org/2003/11/xpath-functions"
xmlns:xf="http://www.w3.org/2002/08/xquery-functions">
    <body>
        <h2>Something</h2>
        <table border="0" width="100%">
            <tr bgcolor="Gray">
                <th align="left">Title</th>
                <th align="left">Price</th>
            </tr>
            <tr>
                <td>Mike</td>
                <td>20$</td>
            </tr>
            <tr>
                <td>Nike</td>
                <td>30$</td>
            </tr>
            <tr>
                <td>Reebok</td>
                <td>40$</td>
            </tr>
        </table>
    </body>
</html>
Word, even in
versions earlier than 2003, had no any
problems with opening HTML; so, just save
the result as .doc (instead of
.HTML) and you'll be done. In case you
are sending the response over the Web, you
can specify the type with:
 Collapse |
Copy Code
Response.AddHeader("content-type", "application/msword");
Response.AddHeader("Content-Disposition", "attachment; filename=report.doc");
The true value of
this option comes into light when you start
thinking about generic reports. In the
source code that accompanies this article,
you'll find a generic version of this
example, the one that works with any
DataTable.
Be sure to check it.
Organization of
resources used for the generation in the
Visual Studio project
The source code I
have attached to this article demonstrates
one possible way of organizing the needed
resources for the
Word reports generation. Here is
the project structure:

Figure 11 - XSL
transform as part of the VS.NET project
for generating Word reports
It is of utmost
importance that Embedded Resource is set on
the Build Action for all the resources that
are used in the
generation of the
Word document
(XML, XSD, XSLT). This enables their later
fetching from the resource collection of the
compiled DLL.
Reports are
generated through a static
Report
class which represents the facade to
embedded resources and the logic exploiting
them:
 Collapse |
Copy Code
public class Report
{
public static byte[] WordGeneratedInvoice()
{
string xmlData = Getters.GetTestXml("WordGeneratedInvoice");
return Getters.GetWord(xmlData, "WordGeneratedInvoice");
}
}
Adding new reports
in this structure is easy:
- The new report
for generation is added in the Doc
directory.
- The XML schema
which is created based on the report is
added in the Xsd directory.
- After the
schema is applied on the document, the
saved WordML is used as the input in the
WML2XSLT tool; the resulting XSLT is
placed in the Xslt directory.
- A method is
added in the
Report
class which is responsible for fetching
XML data, invoking the transformation,
and returning the resulting
Word document.


