Introduction
OpenGL is
great; when it comes to
line drawing, most people would
draw it by:
 Collapse
 |
Copy
Code
float line_vertex[]=
{
    x1,y1, x2,y2
};
glVertexPointer(2, GL_FLOAT, 0, line_vertex);
glDrawArrays(GL_LINES, 0, 2);
It does give you a straight line, but a very ugly
one. To improve this, most people would enable GL
line smoothing:
Collapse |
Copy
Code
glEnable(GL_LINE_SMOOTH);
glHint(GL_LINE_SMOOTH_HINT,  GL_NICEST);
But this technique has a couple of drawbacks:
- Hardware dependent. It does not necessarily
look the same on different machines.
- Average quality. It does not give perfect
quality on most hardware.
- Poor thickness control. Most drivers only
support thickness of integer values. And the
maximum thickness is 10.0 px.
This article
focuses on 2D
rendering in (sub) pixel accuracy. Make sure you
view all images in their original size.
Functionality
The technique introduced in this article gives
you:
- premium quality anti-aliased lines
- smaller CPU overhead than any other CPU
rasterizing algorithm
- finer line thickness control
- line color control
- alpha blend (can choose to use alpha blend
or not)
Believe it, it is rendered in
OpenGL.
Using the code
Collapse |
Copy
Code
void line( double x1, double y1, double x2, double y2, float w, float Cr, float Cg, float Cb, float Br, float Bg, float Bb, bool alphablend);
void hair_line( double x1, double y1, double x2, double y2, bool alphablend=0);
The first function line() gives you
all the functionality. You can choose not to use
alpha blending by setting alphablend to
false; in this case, you will get color
fading to the background. In no- alpha- blending
mode, you still get good results when the background
is solid and lines are not dense. It is also useful
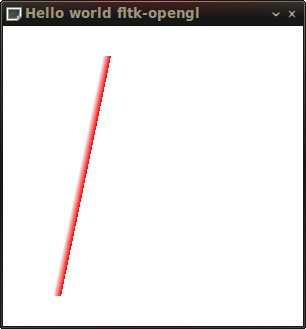
when doing overdraw. The below image should tell you
what alphablend=false means:
The second function hair_line()
draws near-perfectly a black "hair line" of
thickness 1px with no color or thickness control.
You can optionally use alpha blend; otherwise, it
assumes the background is white. I provide this in
case you do not need all the functionalities. You
can just include the header vase_rend_draft_2.h
and it should work. If you copy only part of the
code, make sure you also copy the function.
Collapse |
Copy
Code
static inline double GET_ABS(double x) {return x>0?x:-x;}
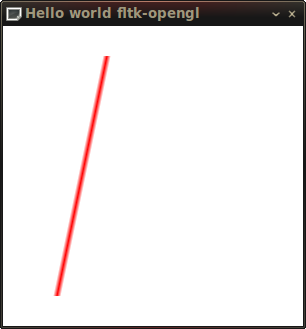
Here is a sample usage with alpha blending:
Collapse |
Copy
Code
glEnable(GL_BLEND);
glBlendFunc(GL_SRC_ALPHA, GL_ONE_MINUS_SRC_ALPHA);
glMatrixMode(GL_PROJECTION);
glPushMatrix();
glLoadIdentity();
glOrtho( 0,context_width,context_height,0,0.0f,100.0f);
glEnableClientState(GL_VERTEX_ARRAY);
glEnableClientState(GL_COLOR_ARRAY);
line ( 10,100,100,300, 1.2, 0.5, 0.0, 1.0, 1.0, 0,0, true);
glDisableClientState(GL_VERTEX_ARRAY);
glDisableClientState(GL_COLOR_ARRAY);
glPopMatrix();
glDisable(GL_BLEND);
and without alpha blending, just fade to
background color:
Collapse |
Copy
Code
glMatrixMode(GL_PROJECTION);
glPushMatrix();
glLoadIdentity();
glOrtho( 0,context_width,context_height,0,0.0f,100.0f);
glEnableClientState(GL_VERTEX_ARRAY);
glEnableClientState(GL_COLOR_ARRAY);
line ( 20,100,110,300, 1.2, 0.5, 0.0, 1.0, 1.0, 1.0, 1.0, false);
glDisableClientState(GL_VERTEX_ARRAY);
glDisableClientState(GL_COLOR_ARRAY);
glPopMatrix();
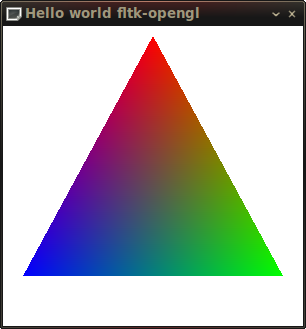
How does that work?
Observation
You just need to know a little bit of
OpenGL. Look at
the hello world OpenGL
program below. It merely draws a triangle with
different colors on each vertex. What do you
observe?
 |
Collapse |
Copy Code
glLoadIdentity();
glOrtho( 0,300,300,0,0.0f,100.0f);
glClearColor( 1,1,1,0.5f);
glClearDepth( 1.0f);
glClear(GL_COLOR_BUFFER_BIT |
GL_DEPTH_BUFFER_BIT);
glEnableClientState(GL_VERTEX_ARRAY);
glEnableClientState(GL_COLOR_ARRAY);
float triangle_vertex[]=
{
150,10, 280,250, 20,250 };
float triangle_color[]=
{
1,0,0, 0,1,0, 0,0,1 };
glVertexPointer(2, GL_FLOAT, 0,
triangle_vertex);
glColorPointer(3, GL_FLOAT, 0,
triangle_color);
glDrawArrays(GL_TRIANGLES, 0, 3);
glDisableClientState(GL_VERTEX_ARRAY);
glDisableClientState(GL_COLOR_ARRAY);
|
Yes, the edge is jaggy. Well, the interpolation
among colors looks perfect.
The 'fade polygon' technique
The above observation is sufficient to enable us
to do what we want. Now let's draw a parallelogram
which changes color from white to red.
 |
Collapse |
Copy Code
float para_vertex[]=
{
50,270,
100,30,
54,270,
104,30
};
float para_color[]=
{
1,1,1, 1,1,1,
1,0,0, 1,0,0
};
glVertexPointer(2, GL_FLOAT, 0, para_vertex);
glColorPointer(3, GL_FLOAT, 0, para_color);
glDrawArrays(GL_TRIANGLE_STRIP, 0, 4);
|
The right side is still jaggy. The left side is
smooth. Can you now think of anything? Now let's
draw two parallelograms which change color from
white to red then to white again.
 |
Collapse |
Copy Code
float para_vertex[]=
{
50,270,
100,30,
54,270,
104,30,
58,270,
108,30
};
float para_color[]=
{
1,1,1, 1,1,1,
1,0,0, 1,0,0,
1,1,1, 1,1,1
};
glVertexPointer(2, GL_FLOAT, 0, para_vertex);
glColorPointer(3, GL_FLOAT, 0, para_color);
glDrawArrays(GL_TRIANGLE_STRIP, 0, 6);
|
Let's call this the 'fade polygon technique':
draw a thin quadrilateral to render the core part of
a line, then draw two more beside the original one
that fade in color. This gives us the effect of
anti-aliasing.
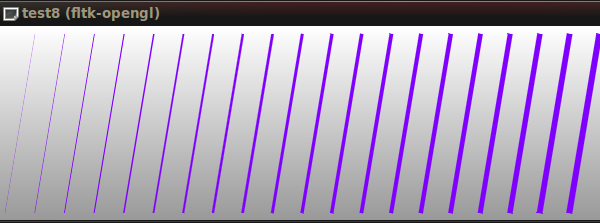
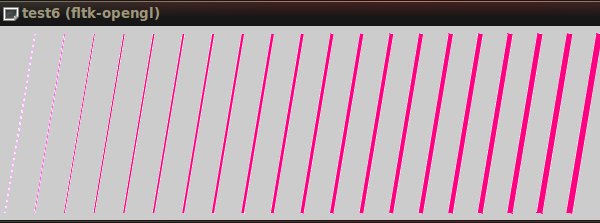
Quality
This article
focuses on 2D line drawing
so the meaning of "perfect quality" is
with respect to 2D graphics.
In particular, Maxim Shemanarev (responsible for
Anti-Grain Geometry) is the boss in fine grained
2D rendering.
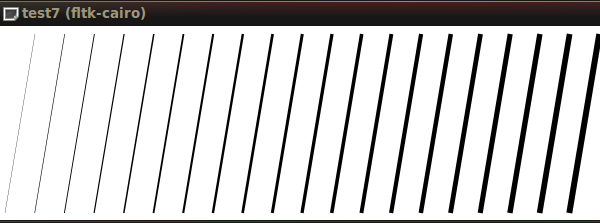
Let's see a picture from his
article.
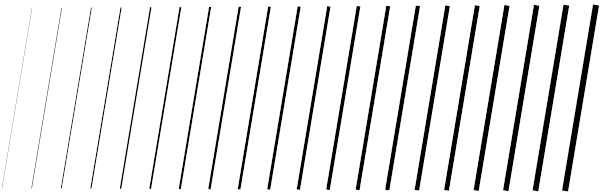
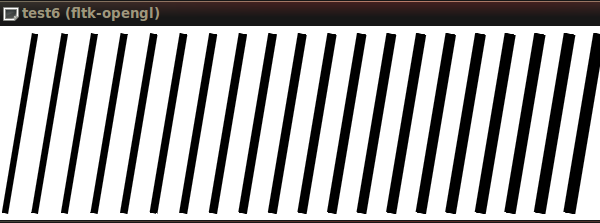
The above picture shows lines with thickness
starting from 0.3 pixels and increasing by 0.3
pixel. Using triangles to approximate line segments
in the correct dimension is not easy. I did it by
experiment and hand calibrated the
drawing code:
then obtained:
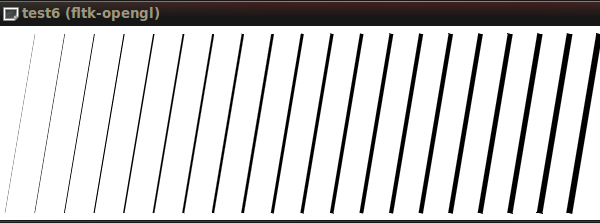
It is not perfect though, the end points are not
sharp enough, and so I say "nearly perfect". I found
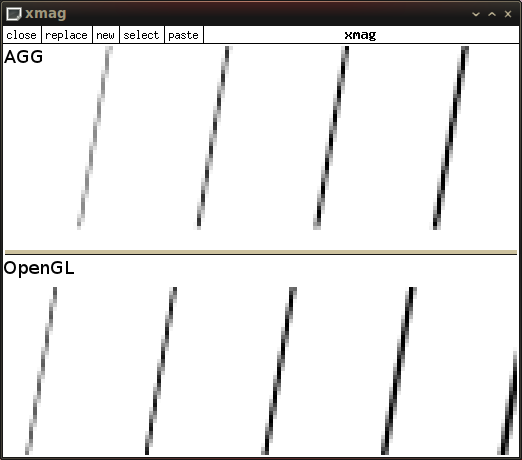
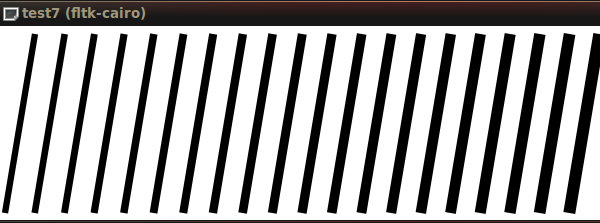
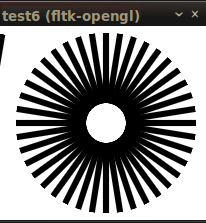
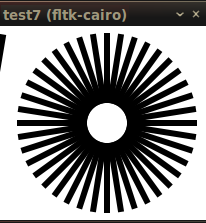
fltk-cairo convenient to build so I actually took
Cairo, the popular 2D
rendering API on Linux, as a benchmark.
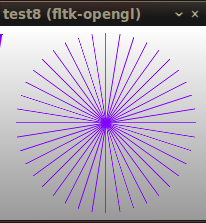
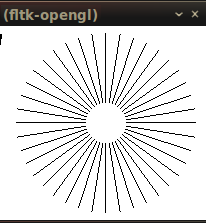
Their difference is subtle, so make sure you flip
them in a slideshow program to observe. I have made
one for you here.
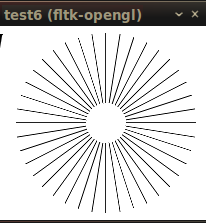
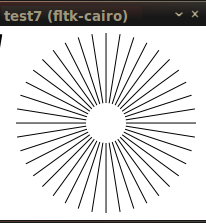
It is seen that Cairo
draws thin lines a little bit thicker
than it should look. The circular fan on the right
is drawn as 1px black lines by
cairo_set_line_width (cr, 1.0).
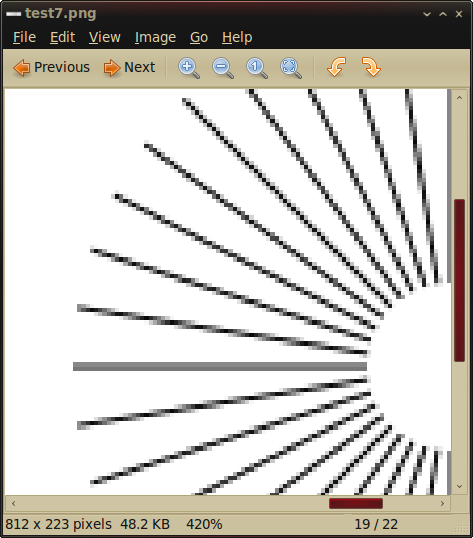
But you see, the horizontal line is a 2px grey
line. In my code, I tried hard to give a 1px #000000
line when you request a 1px #000000 line on the
exact pixel coordinate, especially at
horizontal/vertical condition. But there is no
guarantee in sub- pixel coordinates, other colors,
and orientations.
Ideal 1px black lines should look very close to
aliased raw 1px lines, but just smoother. Now take a
closer look at the fan on the right and flip to
compare there.

A final comparison:
Performance
Today's graphics card can render millions of
triangles per second. This technique takes advantage
of rasterization and is already pretty fast. If you
want to boost things further up, you can generate
the vertices via a geometry shader but that is up to
you. By a brief benchmark, it is 30 times faster
than OpenGL
native line drawing
with smoothing turned on. And 40 times faster
than Cairo when rasterization is heavy (e.g.,
drawing 10000 thick lines).
Portability
I have not tested the code on many machines, so I
cannot guarantee. This technique depends on
rasterizing. There is (always) a higher chance that
a GL driver implements rasterization correctly than
smooth- line drawing. As far as I know, most
hardware support sub- pixel accuracy rasterization.
I observed that rasterization in
OpenGL ES on
iPhone looks good. It would probably work. In my
testing, there are often rounding errors which cause
tiny artifacts. That is not perfect, but still good.
Again I cannot guarantee, the best way is to test it
yourself.
Final words
Using triangles to approximate line segments is
not a new thing, and I believe many programmers did
that back from OpenGL 1.0. The important thing is
calibrating the code to give such high quality and
publishing it. Drawing good looking lines should be
a basic feature of a graphics API. It is strange
after all these years we do not have an elegant
solution and many programs just tolerate aliasing.
The code is designed for easy integration and to
replace "traditional" line drawings with ease. So
download the zip file and include the header to test
it out. If you find this useful, I just hope you
cite this page.
The fade polygon technique is extended to achieve
anti- aliasing for shapes more complex than a line
segment: polylines. Do not miss the second episode,
Drawing polylines by tessellation, of this
article.