|
ActiveX
Control Tutorial, COleControl
|
| |
Kapil Chaturvedi
January 21, 2001
|
Introduction
ActiveX
Programming
This article
is for those enthusiastic VC++
developers who want to build their own ActiveX
controls but don’t know where to start with.
This article will take you to build
your first ActiveX control.
This article will show you the step by step method to build
a control which draws
different waveforms (Sin/Cos).I assume that you are
familiar with VC++ and
know some basics of ActiveX
control.
Creating
an ActiveX Control
Simply
follow these steps in order to create
an ActiveX control.
-
Using
the AppWizard to create
an ActiveX Control
project
-
Select
New from File menu
-
Click
the Projects tab
and select the type of project as MFC
ActiveX Control Wizard from the
list.
-
Name
of new project Plot
and then click the OK button.
-
Take
all the defaults values of the next dialog (titled
MFC
ActiveX Control Wizard - Step 1 of 2)
and click the Next button
-
From
the next dialog (titled MFC
ActiveX Control Wizard - Step 2 of 2),
locate the combo box with the prompt Which
window class, if any, should this control
subclass?. Drop down the list and select the
entry STATIC
from that list. We're using a static control in
this example since we'll just be displaying data
(and not accepting input).
-
Click
on Advanced button and check the Flicker
free activation checkbox.
-
Now
click the Finish button. At this point,
the AppWizard will generate the following three
classes on your behalf:
-
CPlotApp
- The ActiveX "appliction" class is
derived from COleControlModule.
The COleControlModule
class is the base class from which you derive
an OLE control module object. This class
provides member functions for your control
module's initialization (InitInstance)
and cleanup code (ExitInstance).
-
CPlotCtrl
- The second class is derived from COleControl
and will provide most of the functionality to
your control. This is the class where you will
write the majority of the your code.
-
CPlotPropPage
- The third class is CPlotPropPage, (derived
from COlePropertyPage).
This class is used to manage the property page
dialog of your control. In addition to this
class, a dialog resource is also created that
will serve as the property page for the
control.
-
Adding
"Stock" properties
The term stock properties means that its one
of a set of common properties that MFC code stores and
initializes for you. The MFC code also performs
appropriate action when the value of a stock property
is changed. The ClassWizard provides code for changing
nine (9) such properties. Since these properties are
built-in, they are obviously the easiest to deal with
in terms of the work required by the developer. As
you'll see shortly, you literally don't add a single
line of code to add stock property to your control!
The
ClassWizard provides code for the following stock
properties:
-
Appearance
-
BackColor
-
ForeColor
-
BorderStyle
-
Font
-
Caption
-
Enable
-
Text
-
hWnd
From
these, we will work with the Appearance, BackColor,
ForeColor and BorderStyle properties.
We'll
start by adding the BackColor stock property
-
From
the ClassWizard, click the Automation
tab.
-
Ensure
that the CPlotCtrl class is selected in the Class
name combobox. Now, Click the Add
Property button to display the Add
Property dialog.
-
Once
the Add Property
dialog does appear, select the BackColor
property from the External Name combo
box. (It is called the "external name"
because this is how users of the control will
refer to it.)
-
Verify
that the Stock radio button is selected
in the Implementation groupbox.
-
Click
the OK button to finish the generation of
the stock property. At this point, the ClassWizard
will store the value of the BackColor property and
initialize it to background color of the container
window. The ClassWizard will also add the
following line to your control's ODL file:
[id(DISPID_BACKCOLOR), bindable, requestedit] OLE_COLOR BackColor;
Finally,
ClassWizard will also add the code to invalidate
the control whenever the value of the BackColor
property changes, thereby forcing the OnDraw
function to redraw the control. The only thing you
have to do is to use the color contained in the
property to paint the background color of control.
-
At
this point, add the following two (2) lines of
code to the end of the CPlotCtrl::OnDraw member
function
CBrush bkBrush(TranslateColor(GetBackColor()));
pdc->FillRect(rcBounds,&bkBrush);
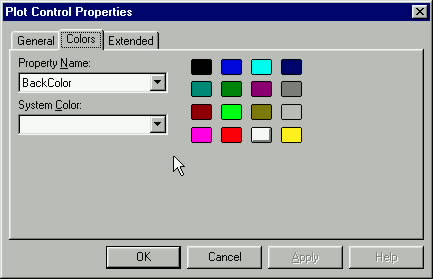
-
Now,
let's add a Color property page to the program.
This page will allow users of the control to
change the BackColor our newly added property
property at design-time. To do this, simply open
the PlotCtrl.cpp
file and locate the comment.
Once
you've done that, you should see the following:
BEGIN_PROPPAGEIDS(CPlotCtrl, 1)
 PROPPAGEID(CPlotPropPage::guid)
END_PROPPAGEIDS(CPlotCtrl)
The
first line tells the compiler how many pages
exist. Notice that it's set to 1. Change this
value to 2 as we're going to add a new page.
Now
insert the following line just before the
END_PROPPAGEIDS line (The CLSID_CColorPropPage is
defined automatically since this is a property
page CLSID for a stock property).
PROPPAGEID(CLSID_CColorPropPage)
Once
you've finished, your new property page id map
should look like the following:
BEGIN_PROPPAGEIDS(CPlotCtrl, 2)
 PROPPAGEID(CPlotPropPage::guid)
 PROPPAGEID(CLSID_CColorPropPage)
END_PROPPAGEIDS(CPlotCtrl)
Once
you make the above changes,the stock property page
is automatically linked to the BackColor property.
-
Now
that you've seen how to add the BackColor stock
property to an ActiveX
control, follow these same steps in
order to add the Appearance, ForeColor
and BorderStyle properties. Note that
you do not need to add a property page for the
other properties.
-
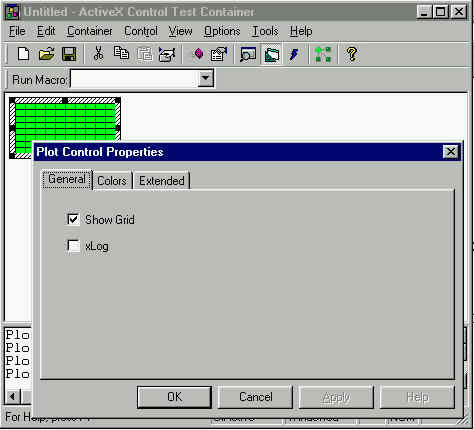
After
adding these stock properties, build your control
and test it using ActiveX
Test Container (which is usually found
under the Tools
menu. As you can see in the figure below, the
ClassWizard has added the appropriate controls for
changing the stock properties.
-
Adding
Custom Properties
Custom properties are properties you devise yourself
for your control. For the plot control I have added
only four custom properties "Grid On/Off"
and "X-Log". The grid properties will
control the visibility of the control grid. The
"x-log" property will be used to plot the
horizontal axis in the logarithmic scale. Let's start
with the grid properties.
-
From
the ClassWizard, click the Automation
tab.
-
Ensure
that the CPlotCtrl class is selected in the Class
name combobox. Now, Click the Add
Property button to display the Add
Property dialog.
-
Once
the Add Property
dialog is displayed, enter ShowGrid into the External
Name combo box.
-
Then
select BOOL as the properties type.
-
Verify
that the Member Variable radio button
selected in the Implementation group box.
-
Click
the OK button to have the ClassWizard
create a boolean custom property named
ShowGrid. Also note that the internal member
variable name (the name used in the control's
code) is m_showGrid. Now, whenever the container
changes the value of this property, the MFC code
will reflect that value in the m_showGrid member
variable and will call the
CPlotCtrl::OnShowGridChanged notification
function.
-
Because
ShowGrid is a custom property, we have to write
our own initialization and implementation code.
Add the following code (marked in bold) in order
to initialize the m_showGrid member variable.
void CPlotCtrl::DoPropExchange(CPropExchange* pPX)
{
 ExchangeVersion(pPX, MAKELONG(_wVerMinor, _wVerMajor));
 COleControl::DoPropExchange(pPX);

 PX_Bool(pPX,_T("ShowGrid"),m_showGrid,FALSE);
}
Locate
the CPlotCtrl::OnShowGridChanged member function
that the ClassWizard added to your code when you
created the ShowGrid property (it should be at the
end of the PlotCtl.cpp
file. Insert the following line (marked in bold)
to that function. (This call simply invalidate the
control when the ShowGrid property value is
changed)
void CPlotCtrl::OnShowGridChanged()
{
 InvalidateControl();
 SetModifiedFlag();
}
-
Since
ShowGrid is a custom property we have to do little
more work to have it included on the property
page. To do this, open the Resource
View tab and open the Property page dialog
(IDD_PROPPAGE_PLOT).
-
Using
the dialog editor add a check box with the ID
IDC_CHECK1 and text value of "Show
Grid".
-
Run
the ClassWizard, select the Member
Variables tab
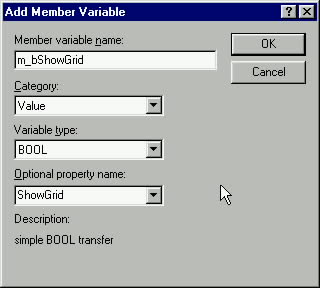
-
Add
a member variable for the control id IDC_CHECK1
called m_bShowGrid of type BOOL. Make sure that
you set the Optional property name to
ShowGrid. When you're finished, the dialog should
look like the figure below.
-
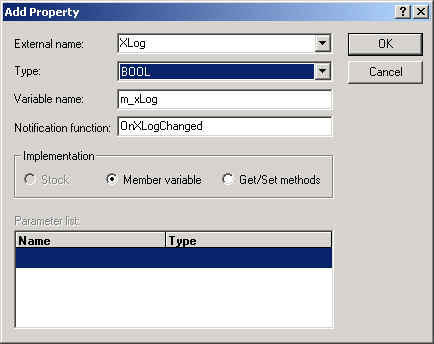
Now,
add the custom property "X-Log" where
the following values are shown in the following
figure.
-
Add
the following line of code to the
CPlotCtrl::DoPropExchange member function:
PX_Bool(pPX,_T("ShowGrid"),m_xLog,FALSE);
-
Just
as you did with the ShowGrid property, add a
checkbox to the control's property page for the
X-Log property and then add a member variable for
it as well.
-
Insert
the following code (marked in bold) in the
CPlotCtrl::OnXLogChanged member function
void CPlotCtrl::OnXLogChanged()
{
  InvalidateControl();
	SetModifiedFlag();
}
-
To
implement these properties, add the following
members to the control:
private:
CRect wndRect,m_DrawRect;
CDC* m_pDC;
void PrepareForPlotting(CRect rect);
void DrawGrid();
-
Modify
the CPlotCtrl::OnDraw member function as follows. (Note:
you will need to include the math.h file due to
the use of the sin function)
void CPlotCtrl::OnDraw(CDC* pdc,
const CRect& rcBounds,
const CRect& rcInvalid)
{
DoSuperclassPaint(pdc, rcBounds);
m_pDC = pdc;
m_DrawRect = rcBounds;
wndRect = rcBounds;
PrepareForPlotting(&rcBounds);
CBrush hbrBackground(TranslateColor(GetBackColor()));
pdc->FillRect (m_DrawRect,&hbrBackground);
if(m_showGrid)
DrawGrid();
float y;
m_pDC->SelectObject(CPen(PS_SOLID,1,GetForeColor()));
m_pDC->MoveTo(m_DrawRect.right/2,
m_DrawRect.bottom/2);
for (int i=0;i<2000;i=i++)
{
y = 512*sin(2*3.1415926535*i/1000)+512;
m_pDC->MoveTo(i , y);
m_pDC->LineTo(i+1 ,
512*sin(2*3.1415926535*(i+1)/1000)+512);
}
}
-
Add
the following code for the DrawGrid function that
you declared.
void CPlotCtrl::DrawGrid()
{
 CPen Pen (PS_SOLID|PS_INSIDEFRAME,1,TranslateColor(GetForeColor()));
 CPen* oldPen = m_pDC->SelectObject (&Pen);

 switch(m_xLog)
 {
  case FALSE:
   int i;

   for (i = m_DrawRect.left;
        i <= m_DrawRect.right ;
        i = i+(( m_DrawRect.right - m_DrawRect.left )/10))
   {
    m_pDC->MoveTo (i, m_DrawRect.top );
    m_pDC->LineTo (i, m_DrawRect.bottom );
   }

   for (i = m_DrawRect.top;
        i <= m_DrawRect.bottom;
        i = i+ (( m_DrawRect.bottom - m_DrawRect.top )/8))
   {
    m_pDC->MoveTo (m_DrawRect.left,i );
    m_pDC->LineTo (m_DrawRect.right,i);
   }
  break;

  case TRUE:
   int x,X;

   for(int j=1;j<= 10;j++)
   {
    x= (int)(log10(j)*285.7143);
    m_pDC->MoveTo (x,m_DrawRect.top);
    m_pDC->LineTo (x,m_DrawRect.bottom );
   }

   X= x;

   m_pDC->SelectObject(&Pen);
   m_pDC->MoveTo (x,m_DrawRect.top);
   m_pDC->LineTo (x,m_DrawRect.bottom );
   m_pDC->SelectObject (&Pen);
   m_pDC->TextOut (x,m_DrawRect.bottom-5,"10.0K");

   for( j=1;j<= 10;j++)
   {
    x= X+(int)(log10(j)*285.7143);
    m_pDC->MoveTo (x,m_DrawRect.top);
    m_pDC->LineTo (x,m_DrawRect.bottom );
   }

   X= x;

   m_pDC->SelectObject(&Pen);
   m_pDC->MoveTo (x,m_DrawRect.top);
   m_pDC->LineTo (x,m_DrawRect.bottom );
   m_pDC->SelectObject (&Pen);
   m_pDC->TextOut (x,m_DrawRect.bottom-5,"100.0K");

   for( j=1;j<= 10;j++)
   {
    x= X+(int)(log10(j)*285.7143);
    m_pDC->MoveTo (x,m_DrawRect.top);
    m_pDC->LineTo (x,m_DrawRect.bottom );
   }

   X= x;

   m_pDC->SelectObject(&Pen);
   m_pDC->MoveTo (x,m_DrawRect.top);
   m_pDC->LineTo (x,m_DrawRect.bottom );
   m_pDC->SelectObject (&Pen);
   m_pDC->TextOut (x,m_DrawRect.bottom-5,"1.0M");

   for( j=1;j<= 10;j++)
   {
    x= X+(int)(log10(j)*285.7143);
    m_pDC->MoveTo (x,m_DrawRect.top);
    m_pDC->LineTo (x,m_DrawRect.bottom );
   }

   X= x;

   m_pDC->SelectObject(&Pen);
   m_pDC->MoveTo (x,m_DrawRect.top);
   m_pDC->LineTo (x,m_DrawRect.bottom );
   m_pDC->SelectObject (&Pen);
   m_pDC->TextOut (x,m_DrawRect.bottom-5,"10.0M");

   for( j=1;j<= 10;j++)
   {
    x= X+(int)(log10(j)*285.7143);
    m_pDC->MoveTo (x,m_DrawRect.top);
    m_pDC->LineTo (x,m_DrawRect.bottom );
   }

  break;
 }
}
-
Add
the following code for the PrepareForPlotting
function that you declared.
void CPlotCtrl::PrepareForPlotting(CRect rect)
{
 m_pDC->SetMapMode(MM_HIMETRIC);
 m_pDC->SetMapMode(MM_ANISOTROPIC);
 m_pDC->SetWindowExt (2000,1024);
 m_pDC->SetViewportExt (rect.right , rect.bottom );
 m_pDC->DPtoLP(&m_DrawRect);

 return;
}
At this
point, you have completed your control and should be able
to build and test it using the ActiveX
Test Container The following figure shows an
example of the control being tested.
About
Author
Kapil is a
software engineer at Scientific Mes-Technik. He has been
working with Visual C++ for the past three years, developing
ActiveX controls.
Presently he is looking for a job offer from a U.S.
company.
Downloads
Download
demo project - 16 Kb
|