UCanCode
Software focuses on general application software development. We provide complete solution for developers. No matter you want to develop a simple database
workflow application, or an large flow/diagram based system, our product will provide a complete solution for you. Our product had been used by hundreds of top companies around the world!
"100% source code provided! Free you from not daring to use components because of unable to master the key technology of components!"
|
|
The
GDI Coordinate Systems, SetViewportOrg,
SetWindowExt, SetViewportExt, SetMapMode
|
|
|
The
Default Coordinate System
|
| |
|
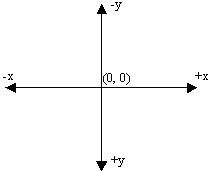
When
drawing on Microsoft Windows, the coordinates of
the drawing area are located on the upper-left
corner of the screen. Everything positioned on the
screen takes its reference on that point. That
point can be illustrated in a Cartesian coordinate
system as (0,0) where the horizontal axis moves
from (0,0) to the right and the vertical axis
moves from (0,0) down:
|
|
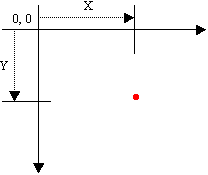
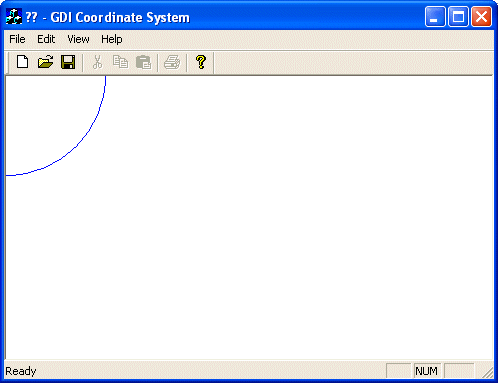
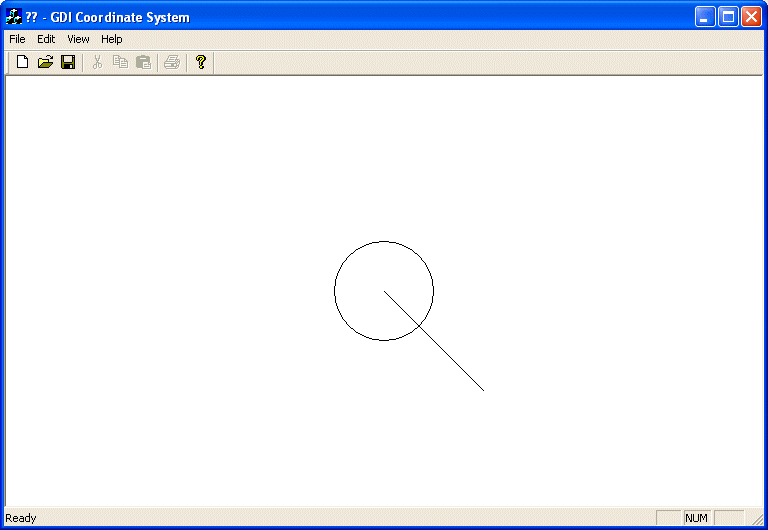
This
starting origin is only the default coordinate
system of the operating system. Therefore, if you
draw a shape with the following call, Ellipse(-100,
-100, 100, 100), you would get a circle whose
center is positioned on the top-left corner of the
screen. In this case, only the lower-right 3/4 of
the circle would be seen:
void CExoDraw1View::OnPaint()
{
	CPaintDC dc(this); // device context for painting

	CPen PenBlue;

	// Blue solid pen width = 1
	PenBlue.CreatePen(PS_SOLID, 1, RGB(0, 12, 255));

	dc.SelectObject(&pPen);
	dc.Ellipse(-100, -100, 100, 100);
}
|
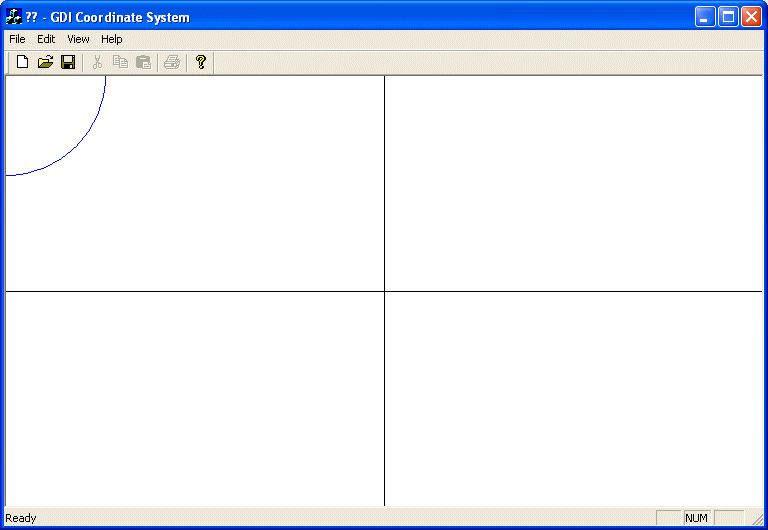
In
the same way, you can draw any geometric
or non-geometric figure you want, using
one of the CPaintDC
methods or creating methods of your
choice. For example, the following code
draws a vertical and a horizontal lines
that cross each other in the center middle
of the form:
|
void CExoDraw1View::OnPaint()
{
	CPaintDC dc(this); // device context for painting

	CRect Recto;
	CPen PenBlue;

	PenBlue.CreatePen(PS_SOLID, 1, RGB(0, 12, 255));
	dc.SelectObject(&PenBlue);
	dc.Ellipse(-100, -100, 100, 100);

	CPen PenBlack;
	PenBlack.CreatePen(PS_SOLID, 1, BLACK_PEN);
	dc.SelectObject(&PenBlack);

	// Retrive the size of the drawing area
	GetClientRect(&Recto);

	dc.MoveTo(Recto.Width() / 2, 0);
	dc.LineTo(Recto.Width() / 2, Recto.Height());
	dc.MoveTo(0, Recto.Height() / 2);
	dc.LineTo(Recto.Width(), Recto.Height() / 2);
}
|
|
|
Changing
the GDI Coordinate System
|
| |
|
As
seen above, the default coordinate system has its
origin set on the top-left section of the screen.
The horizontal axis moves positively from the
origin to the right direction. The vertical axis
moves from the origin to the bottom direction. To
illustrate this, let's draw a circle with a radius
whose center is at the origin (0, 0) with a radius
of 50 units. Let's also draw a line from the
origin (0, 0) to (100, 100):
|
void CExoDraw1View::OnPaint()
{
	CPaintDC dc(this); // device context for painting

	// A circle whose center is at the origin (0, 0)
	dc.Ellipse(-50, -50, 50, 50);

	// A line that starts at (0, 0) and ends at (100, 100)
	dc.MoveTo(0, 0);
	dc.LineTo(100, 100);
}
|
|
This
default origin is fine for most, if not all
regular, operations performed on graphics
applications. For example, most graphics
application, including Paint
Shop Pro use this origin.
Sometimes, you will need to control the position
of the origin of the coordinate system. For
example, most CAD applications, including AutoCAD,
allow the user to set this origin.
The
MFC provides various functions to deal with the
coordinates positions and extents of the drawing
area, including functions used to set the origin
of the coordinate system anywhere you want on the
screen. Since you are drawing on a device context,
all you need to do is simply call the CDC::SetViewportOrg()
method. It is overloaded with two versions, which
allow you to use either the X and the Y
coordinates or a defined point. The syntaxes of
this method are:
|
SetViewportOrg(int X, int Y);
|
SetViewportOrg(CPoint Pt);
|
|
When
calling this function, simply specify where you
want the new origin to be. If using the second
version, the argument can be a Win32 POINT
structure or an MFC CPoint class. To see the
effect of this function, let's move the origin 200
units in the positive direction of the X axis and
150 units in the positive direction of the
vertical axis without changing the circle and the
line. Our OnPaint event would look like this:
|
void CExoDraw1View::OnPaint()
{
	CPaintDC dc(this); // device context for painting

	dc.SetViewportOrg(200, 150);

	// A circle whose center is at the origin (0, 0)
	dc.Ellipse(-50, -50, 50, 50);

	// A line that starts at (0, 0) and ends at (100, 100)
	dc.MoveTo(0, 0);
	dc.LineTo(100, 100);
}
|
|
Note
that you can also position the origin relative to
the size of the client area. Here is an example:
|
void CExoDraw1View::OnPaint()
{
	CPaintDC dc(this); // device context for painting
	CRect Recto;

	// Retrieve the size of the drawing area
	GetClientRect(&Recto);

	dc.SetViewportOrg(Recto.Width() / 2, Recto.Height() / 2);

	// A circle whose center is at the origin (0, 0)
	dc.Ellipse(-50, -50, 50, 50);

	// A line that starts at (0, 0) and ends at (100, 100)
	dc.MoveTo(0, 0);
	dc.LineTo(100, 100);
}
|
|
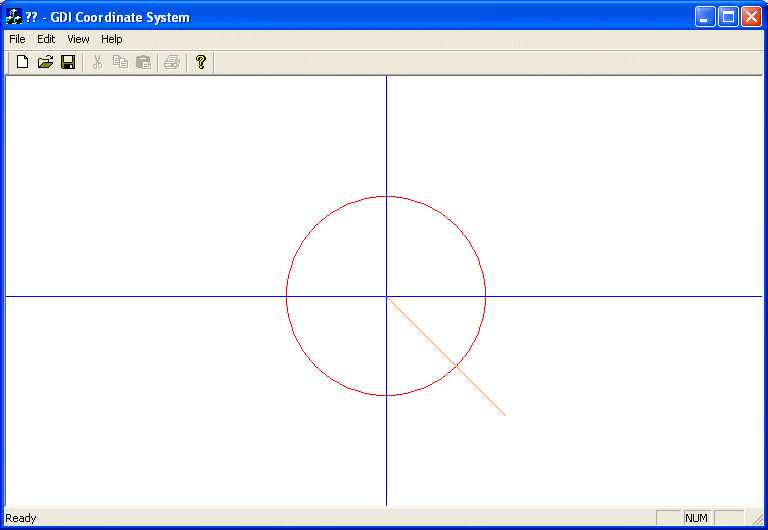
Now
that we know how to control the origin, we will
position it at a fixed point, 380 units to the
right and 220 units down. We can also easily draw
the (Cartesian) axes now:
|
void CExoDraw1View::OnPaint()
{
	CPaintDC dc(this); // device context for painting
	CRect Recto;

	dc.SetViewportOrg(380, 220);

	// Use a red pen
	CPen PenRed(PS_SOLID, 1, RGB(255, 0, 0));
	dc.SelectObject(PenRed);
	// A circle whose center is at the origin (0, 0)
	dc.Ellipse(-100, -100, 100, 100);

	// Use a blue pen
	CPen PenBlue(PS_SOLID, 1, RGB(0, 0, 255));
	dc.SelectObject(PenBlue);
	// Horizontal axis
	dc.MoveTo(-380, 0);
	dc.LineTo(380, 0);
	// Vertical axis
	dc.MoveTo(0, -220);
	dc.LineTo(0, 220);
}
|

|
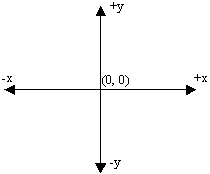
As
seen already, the SetViewportOrg()
method can be used to change the origin of the
device context. It also uses an orientation of
axes so that the horizontal axis moves
positively from (0, 0) to the right. The vertical
axis moves positively from (0, 0) down.
|
|
To
illustrate this, let's draw an orange line at 45°
from the origin:
|
void CExoDraw1View::OnPaint()
{
	CPaintDC dc(this); // device context for painting

	dc.SetViewportOrg(380, 220);

	// Use a red pen
	CPen PenRed(PS_SOLID, 1, RGB(255, 0, 0));
	dc.SelectObject(PenRed);
	// A circle whose center is at the origin (0, 0)
	dc.Ellipse(-100, -100, 100, 100);

	// Use a blue pen
	CPen PenBlue(PS_SOLID, 1, RGB(0, 0, 255));
	dc.SelectObject(PenBlue);
	// Horizontal axis
	dc.MoveTo(-380, 0);
	dc.LineTo(380, 0);
	// Vertical axis
	dc.MoveTo(0, -220);
	dc.LineTo(0, 220);

	// An orange pen
	CPen PenOrange(PS_SOLID, 1, RGB(255, 128, 0));
	dc.SelectObject(PenOrange);
	// A diagonal line at 45 degrees
	dc.MoveTo(0, 0);
	dc.LineTo(120, 120);
}
|
|
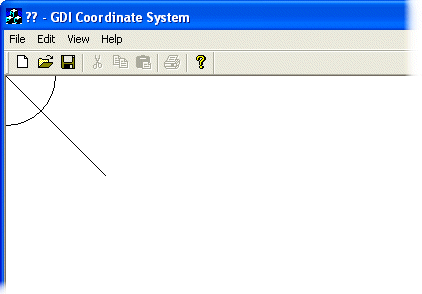
As
you can see, our line is not at 45º. Instead of
being in the first quadrant, it is in the fourth.
This is due to the default orientation of the
coordinate system.
|
|
To
control the orientation of the axes of the device
context, you use a method of the CDC class called SetMapMode().
Its syntax is:
int SetMapMode(int nMapMode);
As
you are about to see, this method can be used to
do two things, depending on the value of the
argument. It can control the orientation of the
coordinate system you want to use for your
application. It also helps with the unit system
you would prefer to use.
The
argument of this method is a constant integer that
species the mapping mode used. The possible values
are MM_TEXT, MM_LOENGLISH, MM_HIENGLISH,
MM_ANISOTROPIC, MM_HIMETRIC, MM_ISOTROPIC,
MM_LOMETRIC, and MM_TWIPS.
|
|
The
default map mode used is the MM_TEXT. In
other words, if you don't specify another, this is
the one your application would use. With this map
mode, the dimensions or measurements you specify
in your CDC methods are respected and kept
"as is". Also, the axes are oriented so
the horizontal axis moves from (0, 0) to the right
and the vertical axis moves from (0, 0) down. For
example, the above OnPaint event can be
re-written as follows and would produce the same
result:
|
void CExoDraw1View::OnPaint()
{
	CPaintDC dc(this); // device context for painting

	dc.SetMapMode(MM_TEXT);
	dc.SetViewportOrg(380, 220);

	// Use a red pen
	CPen PenRed(PS_SOLID, 1, RGB(255, 0, 0));
	dc.SelectObject(PenRed);
	// A circle whose center is at the origin (0, 0)
	dc.Ellipse(-100, -100, 100, 100);

	// Use a blue pen
	CPen PenBlue(PS_SOLID, 1, RGB(0, 0, 255));
	dc.SelectObject(PenBlue);
	// Horizontal axis
	dc.MoveTo(-380, 0);
	dc.LineTo(380, 0);
	// Vertical axis
	dc.MoveTo(0, -220);
	dc.LineTo(0, 220);

	// An orange pen
	CPen PenOrange(PS_SOLID, 1, RGB(255, 128, 0));
	dc.SelectObject(PenOrange);
	// A diagonal line at 45 degrees
	dc.MoveTo(0, 0);
	dc.LineTo(120, 120);
}
|
The result is the same,
as if no map mode was specified:
|
The
MM_LOENGLISH, like some of the other map
modes (excluding MM_TEXT as seen above),
performs two actions. It changes the orientation
of the vertical axis: the positive y axis would
move from (0, 0) up:
|
|
Also,
each unit of measure is multiplied by 0.01 inch,
which means each unit you provide is divided by
100 (unit/100). This also means that the units are
reduced from their stated measures by a 100th.
Observe the effect of the MM_LOENGLISH map
mode on the above OnPaint() event :
|
void CExoDraw1View::OnPaint()
{
	CPaintDC dc(this); // device context for painting

	dc.SetMapMode(MM_LOENGLISH);
	dc.SetViewportOrg(380, 220);

	. . .
}
|

|
As
you can see, now the lines are drawn respecting
the positive and the negative orientations of the
axes, fulfilling the requirements of a Cartesian
coordinate system. At the same time, the lengths
we used have been reduced: the circle is smaller
and the lines are shorter.
Like
the MM_LOENGLISH map mode, the MM_HIENGLISH
sets the orientation so the vertical axis moves
from (0, 0) up. Unlike the MM_LOENGLISH,
the MM_HIENGLISH map mode reduces each unit
by a factor of 0.001 inch. This means that each
unit is divided by 1000 (1/1000 = 1000th)
which is significant and can change the display of
a drawing. Here is its effect:
|
void CExoDraw1View::OnPaint()
{
	CPaintDC dc(this); // device context for painting

	dc.SetMapMode(MM_HIENGLISH);
	dc.SetViewportOrg(380, 220);

	. . . Same as previous
}
|
 |
|
Notice
that we are still using the same dimensions for
our lines and circle.
The
MM_LOMETRIC map mode uses the same axes
orientation as the previous two modes. By
contrast, the MM_LOMETRIC multiplies each
unit by 0.1 millimeter. This means that each unit
is reduced by 10%. Here is an example:
|
void CExoDraw1View::OnPaint()
{
	CPaintDC dc(this); // device context for painting

	dc.SetMapMode(MM_LOMETRIC);
	dc.SetViewportOrg(380, 220);

	. . .
}
|
 |
|
The
MM_HIMETRIC map mode uses the same axes of
orientation as the above three modes. Its units
are gotten by multiplying each of the given units
by 0.01 millimeter. Here is an example:
|
void CExoDraw1View::OnPaint()
{
	CPaintDC dc(this); // device context for painting

	dc.SetMapMode(MM_HIMETRIC);
	dc.SetViewportOrg(380, 220);

	. . . Same as previous
}
|
 |
|
The
MM_TWIPS map mode divides each logical unit
by 20. Actually a twip is equivalent to 1/1440
inch. Besides this unit conversion, the axes are
oriented so the horizontal axis moves from the
origin (0, 0) to the right while the vertical axis
moves from the origin (0, 0) up. Here is an
example:
|
void CExoDraw1View::OnPaint()
{
	CPaintDC dc(this); // device context for painting
	CRect Recto;

	dc.SetMapMode(MM_TWIPS);

	dc.SetViewportOrg(380, 220);

	. . .
}
|

|
Customizing
the Unit and Coordinate Systems
|
| |
|
The
map modes we have used so far allowed us to select
the orientation of the axes, especially the y
axis. Furthermore, we couldn't influence any
conversion unit for the dimensions we specified on
our drawings. This is because each one of these
mapping modes (MM_TEXT, MM_HIENGLISH,
MM_LOENGLISH, MM_HIMETRIC, MM_LOMETRIC,
and MM_TWIPS) has a fixed set of attributes
such as the orientation of its axes and the
conversion used on the provided dimensions. What
if you want to control the orientation of axes
and/or the conversion applied on the dimensions
you provide in your drawing (have you ever used
AutoCAD?).
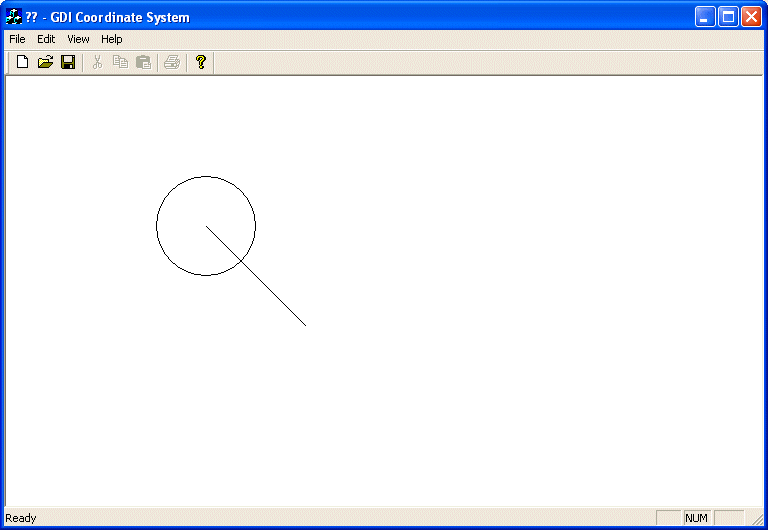
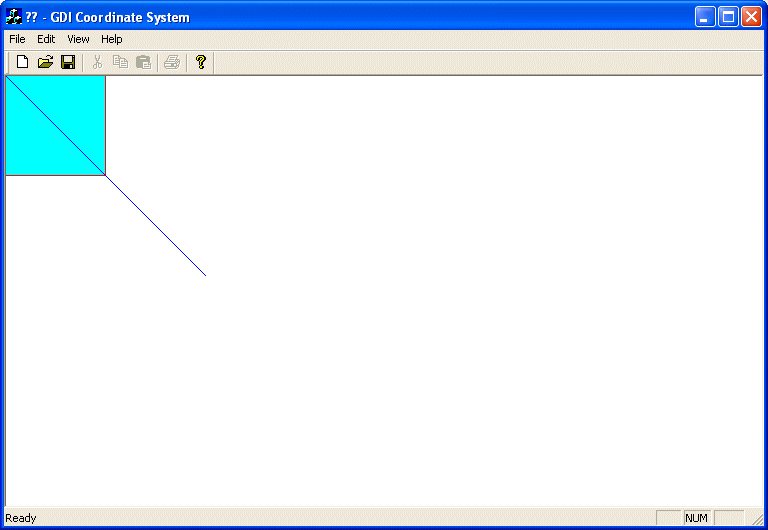
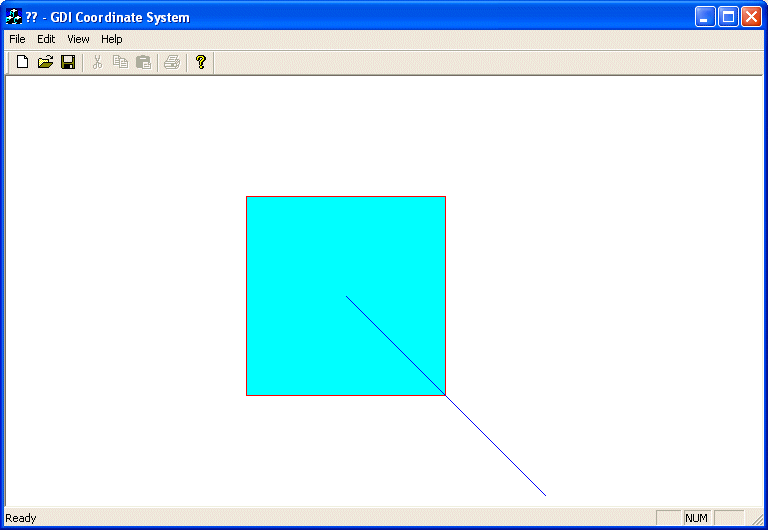
Consider
the following OnPaint() event. It draws a 200x200
pixels square with a red border and an aqua
background. The square starts at 100x100 pixels on
the negative sides of both axes and it continues
100x100 pixels on the positive sides of both axes.
For better illustration, the event also draws a
diagonal line at 45º starting at the origin (0,
0):
|
void CExoDraw1View::OnPaint()
{
    CPaintDC dc(this); // device context for painting

    CPen PenRed(PS_SOLID, 1, RGB(255, 0, 0));
    CBrush BrushAqua(RGB(0, 255, 255));

    dc.SelectObject(PenRed);
    dc.SelectObject(BrushAqua);
    // Draw a square with a red border and an aqua background
    dc.Rectangle(-100, -100, 100, 100);

    CPen BluePen(PS_SOLID, 1, RGB(0, 0, 255));
    dc.SelectObject(BluePen);
    // Diagonal line at 45 degrees starting at the origin (0, 0)
    dc.MoveTo(0, 0);
    dc.LineTo(200, 200);
}
|
This would produce:
|
As
you can see, we get only the the lower-right 3/4
portion of the square and the line is pointing in
the 3 to 6 quadrant of a clock .
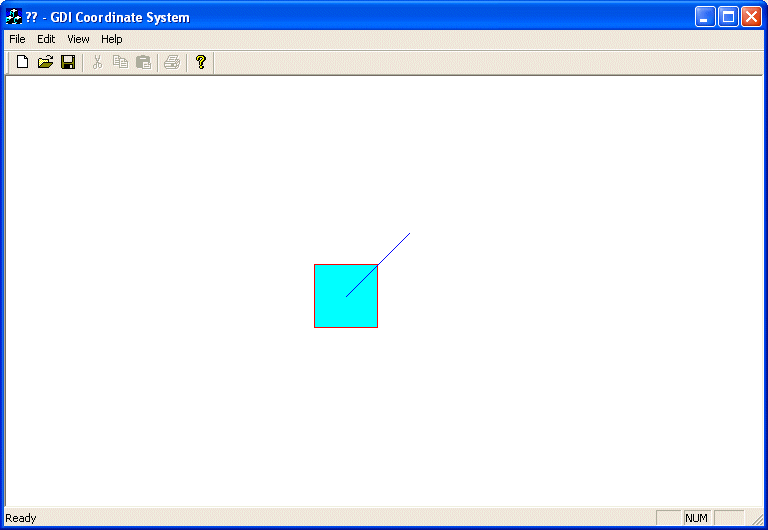
Imagine
that you want the origin (0, 0) to be positioned
in the center middle of the form, or to be more
precise, to position the origin at (340, 220). We
saw already that you could use the CDC::SetViewportOrg()
method (keep in mind that this method only changes
the origin of the coordinate system; it doesn't
influence the orientation of axes nor does it
control the units or dimensions) to specify the
origin. Here is an example (we are not specifying
the map mode because MM_TEXT can be used
for us as the default):
|
void CExoDraw1View::OnPaint()
{
    CPaintDC dc(this); // device context for painting

    dc.SetViewportOrg(340, 220);

    CPen PenRed(PS_SOLID, 1, RGB(255, 0, 0));
    CBrush BrushAqua(RGB(0, 255, 255));

    dc.SelectObject(PenRed);
    dc.SelectObject(BrushAqua);
    // Draw a square with a red border and an aqua background
    dc.Rectangle(-100, -100, 100, 100);

    CPen BluePen(PS_SOLID, 1, RGB(0, 0, 255));
    dc.SelectObject(BluePen);
    // Diagonal line at 45 degrees starting at the origin (0, 0)
    dc.MoveTo(0, 0);
    dc.LineTo(200, 200);
}
|
This would produce:
|
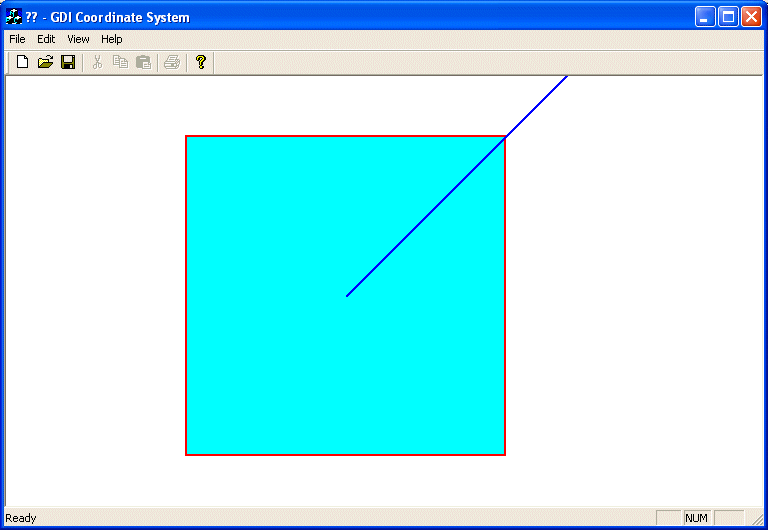
To
control your own unit system, the orientation of
the axes or how the application converts the units
used on your application, use either the MM_ISOTROPIC
or the MM_ANISOTROPIC map modes. The first
thing you should do is to call the CDC::SetMapMode()
method and specify one of these two constants
(either MM_ISOTROPIC or MM_ANISOTROPIC).
Here is an example:
|
void CExoDraw1View::OnPaint()
{
    CPaintDC dc(this); // device context for painting

    dc.SetMapMode(MM_ISOTROPIC);
    dc.SetViewportOrg(340, 220);

    CPen PenRed(PS_SOLID, 1, RGB(255, 0, 0));
    CBrush BrushAqua(RGB(0, 255, 255));

    dc.SelectObject(PenRed);
    dc.SelectObject(BrushAqua);
    // Draw a square with a red border and an aqua background
    dc.Rectangle(-100, -100, 100, 100);

    CPen BluePen(PS_SOLID, 1, RGB(0, 0, 255));
    dc.SelectObject(BluePen);
    // Diagonal line at 45 degrees starting at the origin (0, 0)
    dc.MoveTo(0, 0);
    dc.LineTo(200, 200);
}
|
|
Don't
rely on the above picture, after calling the CDC::SetMapMode()
method with MM_ISOTROPIC (or MM_ANISOTROPIC)
as argument, you are not supposed to stop there.
The purpose of these two map modes is to let you
control the orientation of the axes and the
conversion of the units.
The
difference between both map modes is that, when
using the MM_ISOTROPIC map mode, one unit
in the horizontal axis is equivalent to one unit
in the vertical axis. This is not the case for the
MM_ANISOTROPIC map mode which allows you to
control however the units should be converted on
each individual axis.
Therefore,
after calling SetMapMode() and specifying
the MM_ISOTROPIC (or MM_ANISOTROPIC),
you must call the CDC:SetWindowExt()
method. This method specifies how much each new
unit will be multiplied by the old or default unit
system. The CDC::SetWindowExt() method
comes in two versions with the following syntaxes:
CSize SetWindowExt(int cx, int cy);
CSize SetWindowExt(SIZE size);
If
using the first version, the first argument to
this method, cx, specifies the logical
conversion multiplier used for each unit on the
horizontal axis. The second argument, cy,
specifies the logical conversion multiplier used
for each unit on the vertical axis.
The
second version of the method can be used if you
know the desired logical width and height as a SIZE
object. Here is an example:
|
void CExoDraw1View::OnPaint()
{
    CPaintDC dc(this); // device context for painting

    dc.SetMapMode(MM_ISOTROPIC);
    dc.SetViewportOrg(340, 220);
    dc.SetWindowExt(480, 480);

    CPen PenRed(PS_SOLID, 1, RGB(255, 0, 0));
    CBrush BrushAqua(RGB(0, 255, 255));

    dc.SelectObject(PenRed);
    dc.SelectObject(BrushAqua);
    // Draw a square with a red border and an aqua background
    dc.Rectangle(-100, -100, 100, 100);

    CPen BluePen(PS_SOLID, 1, RGB(0, 0, 255));
    dc.SelectObject(BluePen);
    // Diagonal line at 45 degrees starting at the origin (0, 0)
    dc.MoveTo(0, 0);
    dc.LineTo(200, 200);
}
|
This would produce:
|
After
calling the SetWindowExt() function, you
should call the SetViewportExt() function.
Its job is to specify the horizontal and vertical
units of the device context being used. It comes
in two flavors with the following syntaxes:
CSize SetViewportExt(int cx, int cy);
CSize SetViewportExt(SIZE size);
To
use the first version of this function, you must
provide the units of device conversion as cx
for the horizontal axis and as cy for the
vertical axis.
If
you know the size as a width/height combination of
the device unit conversion, you can use the second
version of the method and supply this size
argument.
Here
is an example:
|
void CExoDraw1View::OnPaint()
{
    CPaintDC dc(this); // device context for painting

    dc.SetMapMode(MM_ISOTROPIC);
    dc.SetViewportOrg(340, 220);
    dc.SetWindowExt(480, 480);
    dc.SetViewportExt(440, -680);

    CPen PenRed(PS_SOLID, 1, RGB(255, 0, 0));
    CBrush BrushAqua(RGB(0, 255, 255));

    dc.SelectObject(PenRed);
    dc.SelectObject(BrushAqua);
    // Draw a square with a red border and an aqua background
    dc.Rectangle(-100, -100, 100, 100);

    CPen BluePen(PS_SOLID, 1, RGB(0, 0, 255));
    dc.SelectObject(BluePen);
    // Diagonal line at 45 degrees starting at the origin (0, 0)
    dc.MoveTo(0, 0);
    dc.LineTo(200, 200);
}
|
This would produce:
|
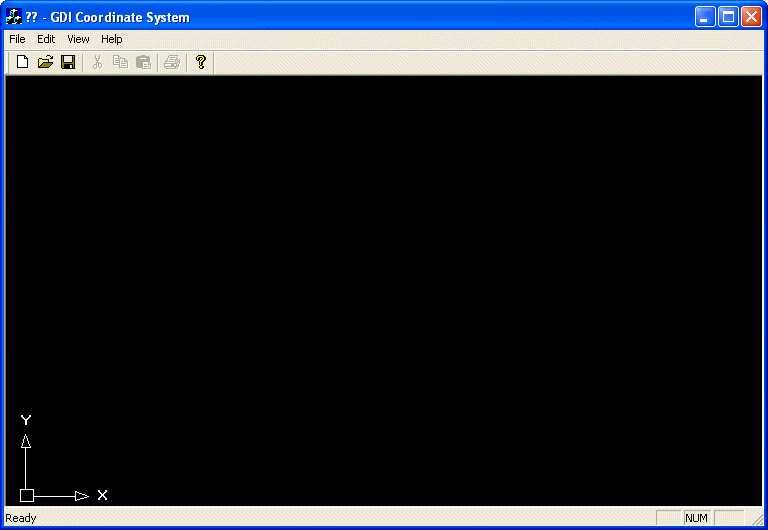
Example
drawing axes orientation arrows:
|
void CExoDraw1View::OnPaint()
{
    CPaintDC dc(this); // device context for painting

    CBrush bgBrush(BLACK_BRUSH);
    dc.SelectObject(bgBrush);
    dc.Rectangle(Recto);

    dc.SetMapMode(MM_ISOTROPIC);
    dc.SetViewportOrg(0, 440);
    dc.SetWindowExt(480, 480);
    dc.SetViewportExt(440, -680);

    CPen PenWhite(PS_SOLID, 1, RGB(255, 255, 255));
    dc.SelectObject(PenWhite);

    dc.MoveTo(21, 20);
    dc.LineTo(21, 75);
    // Up arrow
    dc.MoveTo(16, 75);
    dc.LineTo(21, 90);
    dc.LineTo(26, 75);
    dc.LineTo(16, 75);

    dc.MoveTo(21, 22);
    dc.LineTo(75, 22);
    // Right arrow
    dc.MoveTo(75, 17);
    dc.LineTo(90, 22);
    dc.LineTo(75, 27);
    dc.LineTo(75, 17);

    dc.SetBkMode(TRANSPARENT);
    dc.SetTextColor(RGB(255, 255, 255));
    dc.TextOut(16, 114, 'Y');
    dc.TextOut(100, 32, 'X');
    dc.Rectangle(15, 15, 30, 30);
}
|
|
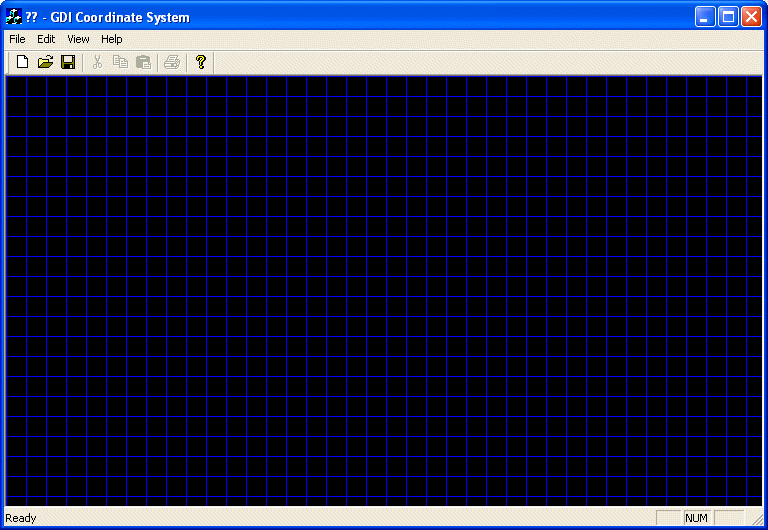
Line
Grid
|
void CExoDraw1View::OnPaint()
{
    CPaintDC dc(this); // device context for painting
    CRect Recto;

    GetClientRect(&Recto);

    CBrush bgBrush(BLACK_BRUSH);
    dc.SelectObject(bgBrush);
    dc.Rectangle(Recto);

    CPen PenBlue(PS_SOLID, 1, RGB(0, 0, 255));
    dc.SelectObject(PenBlue);

    for(int x = 0; x < Recto.Width(); x += 20)
    {
        dc.MoveTo(x, 0);
        dc.LineTo(x, Recto.Height());
    }

    for(int y = 0; y < Recto.Height(); y += 20)
    {
        dc.MoveTo(0, y);
        dc.LineTo(Recto.Width(), y);
    }
}
|
|
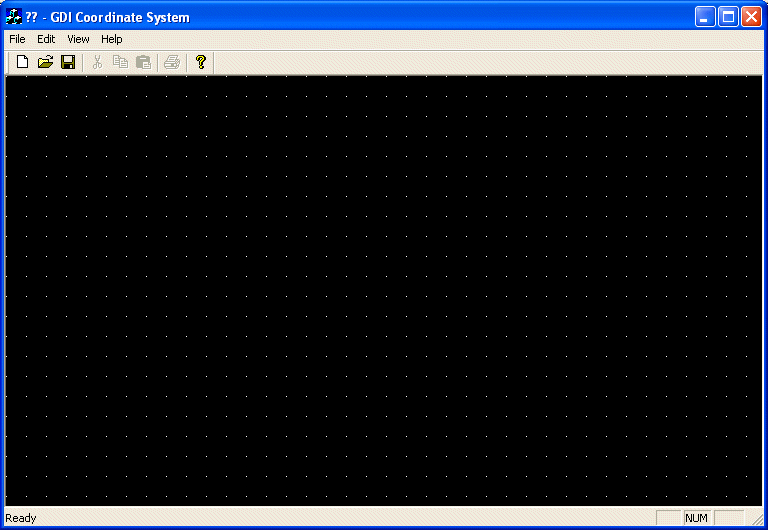
Point
Grid
|
void CExoDraw1View::OnPaint()
{
    CPaintDC dc(this); // device context for painting
    CRect Recto;

    GetClientRect(&Recto);

    CBrush bgBrush(BLACK_BRUSH);
    dc.SelectObject(bgBrush);
    dc.Rectangle(Recto);

    for(int x = 0; x < Recto.Width(); x += 20)
    {
        for(int y = 0; y < Recto.Height(); y += 20)
        {
		dc.SetPixel(x, y, RGB(255, 255, 255));
        }
    }
}
|
|
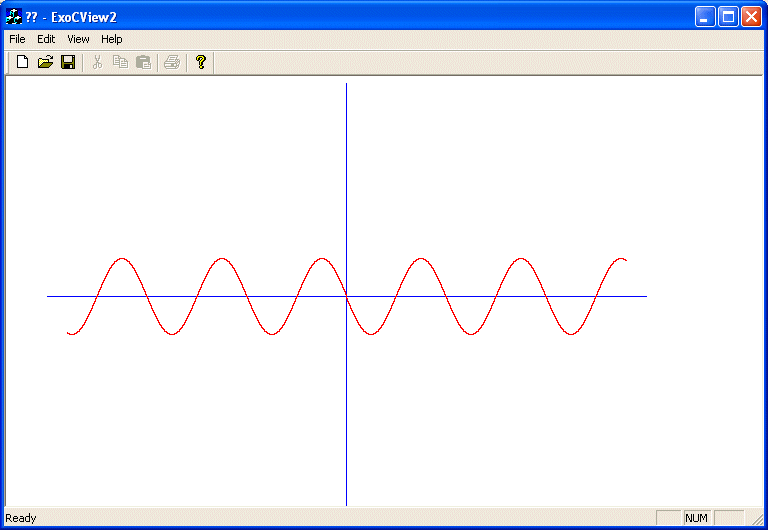
Sinus
|
void CExoView::OnPaint()
{
	CPaintDC dc(this); // device context for painting

	// TODO: Add your message handler code here
	dc.SetMapMode(MM_ANISOTROPIC);
	dc.SetViewportOrg(340, 220);
	dc.SetWindowExt(1440, 1440);
	dc.SetViewportExt(-1440, -220);

	CPen PenBlue(PS_SOLID, 1, RGB(0, 0, 255));
	dc.SelectObject(PenBlue);

	// Axes
	dc.MoveTo(-300,     0);
	dc.LineTo( 300,     0);
	dc.MoveTo(   0, -1400);
	dc.LineTo(   0,  1400);

	// I am exaggerating with the PI value here but why not?
	const double PI = 3.141592653589793238462643383279;

	// The following two values were chosen randomly by me.
	// You can chose other values you like
	const int MultiplyEachUnitOnX = 50;
	const int MultiplyEachUnitOnY = 250;

	for(double i = -280; i < 280; i += 0.01)
	{
	    double j = sin(PI / MultiplyEachUnitOnX * i) * MultiplyEachUnitOnY;
	    dc.SetPixel(i, j, RGB(255, 0, 0));
	}
	// Do not call CView::OnPaint() for painting messages
}
|
|
|
|