Visual Studio 2005
Update
Please
note that I have added a downloadable demo
project for Visual
Studio 2005 users. Everything in
the original article applies to
Visual Studio 2005
usage as well, except for the bit
about using ClassWizard to create your
class/object associations. I'm assuming that
if you are using
Visual Studio 2005, you already
know how to define associations, add event
handlers, etc. So, just ignore the
ClassWizard comments. The important thing is
that if you derive your own class, you must
make certain that the resource ID of your
dialog bar
matches the resource ID defined in the class
header. If you use the derived classes that
I have provided, then you simply need to
name your dialog
bar resource in the resource
editor
IDD_DIALOGBAR
and you will be fine. Look over the demo and
if you still have difficulty getting it
implemented, drop me a line.
Introduction
I've
seen a lot of posts lately in forums and
article comments from readers wanting to
know how to use owner-drawn or custom
controls in a dialog bar. Even though this
information is available in various articles
from Microsoft, I decided to post this
article as a sort of tutorial bringing all
the information together into one
article.... and of course, providing working
examples to look at.
In
order to achieve this, you have to base your
dialog bar on a class derived from
CDialogBar.
Since AppWizard does not support this
operation, you have to derive the class from
CDialog
and then manually convert it to a
CDialogBar
class. Since the Microsoft article gives you
step-by-step instructions, I'm not going to
duplicate their work. I'll just point you to
that article:
HOWTO: How to Initialize Child Controls in a
Derived CDialogBar.
There
is also a companion
article:
INFO: Using CBitmapButton in
CDialogBar
and CFormView.
The
derived classes in this example were created
following the instructions from this
article, primarily.
Using
the Sample Classes
To use
the example
classes in your app, simply follow these
steps. I'm assuming that you are using
Visual Studio, in my case, 6.
First,
from the Visual Studio main menu, click
INSERT/RESOURCE and then expand DIALOG.
Click
IDD_DIALOGBAR
and click NEW. You now have a new dialog bar
resource added to your project. By default,
the ID of this resource is
IDD_DIALOGBAR.
Leave that as it is; if you change the ID,
then you must change the ID in the derived
class header as well. Now add the
MyDlgBar.h and MyDlgBar.cpp
files from the DERIVED CLASSES
folder of the sample project to your
project.
At
this point, you will want to link your
dialog bar to your derived class. Go to your
project folder and delete (or rename) the
*.clw file. Then select your
dialog bar
in the resource editor and press CTRL_W.
ClassWizard will prompt to rebuild the class
wizard database. Make sure the
MyDlgBar.h and MyDlgBar.cpp
files are in the list and let it rebuild. It
will then prompt you to add a new class or
select an existing class for your dialog bar
resource. Choose SELECT EXISTING CLASS and
then select the
CMyDlgBar
class. Click OK. Now at the top of your
MainFrm.h file, just above the class
declaration, add the line shown below:
. . . . . . . . . . . .
#if _MSC_VER > 1000
#pragma once
#endif
#include "MyDlgBar.h" <--- ADD THIS LINE
class CMainFrame : public CFrameWnd
{
. . . . . . . . . . . . . . .
Then,
inside the class declaration of your
MainFrm.h file, create an instance of
the dialog bar like this:
. . . . . . . . . . . . . . .
public:
virtual ~CMainFrame();
#ifdef _DEBUG
virtual void AssertValid() const;
virtual void Dump(CDumpContext& dc) const;
#endif
protected: CMyDlgBar m_myDlgBar; <----- ADD THIS LINE
CStatusBar m_wndStatusBar;
CToolBar m_wndToolBar;
. . . . . . . . . . . . . . .
Finally, to the
OnCreate()
function of your MainFrm.cpp file,
add the following code:
if (!m_myDlgBar.Create(this, IDD_DIALOGBAR,
CBRS_TOP | CBRS_GRIPPER |CBRS_TOOLTIPS |
CBRS_FLYBY | CBRS_HIDE_INPLACE,
IDD_VIEW_DIALOGBAR))
{
TRACE0("Failed to create dialog bar m_wndDlgBar\n");
return -1; }
m_myDlgBar.EnableDocking(CBRS_ALIGN_TOP | CBRS_ALIGN_BOTTOM);
EnableDocking(CBRS_ALIGN_ANY);
DockControlBar(&m_myDlgBar);
You
can modify this if you like. This creates a
standard dockable dialog bar with a gripper,
so that it can be undocked or moved. By
default, it is created docked at the top of
the app. Note
IDD_VIEW_DIALOGBAR
in the
Create
function. This is used if you want to add a
menu option in the View menu to toggle
hide/show of the dialog bar, as is normally
done with the toolbar and status bar. Adding
this function is easy. Just create a new
menu item on the View menu in your resource
editor. Give it an ID of
IDD_VIEW_DIALOGBAR
and whatever caption you wish, like
&Dialog Bar.
Then add the following two lines of code to
the
AFX_MESSAGE_MAP
section of your MainFrm.cpp file,
like this:
BEGIN_MESSAGE_MAP(CMainFrame, CFrameWnd)
ON_WM_CREATE()
ON_COMMAND_EX(IDD_VIEW_DIALOGBAR, OnBarCheck)
ON_UPDATE_COMMAND_UI(IDD_VIEW_DIALOGBAR, OnUpdateControlBarMenu)
END_MESSAGE_MAP()
Now
you can compile and run. You will have a
working dialog bar, except that you have
nothing on it. So let's add an owner-drawn
CBitmapButton
for fun.
Adding an Owner-Drawn
CBitmapButton
Just
add a button to the dialog bar as normal. In
Properties, check caption Owner-drawn. Give
it an ID of
IDC_BUTTON_BITMAP
and a caption of BUTTON. This is the
important part here because the
AutoLoad()
function reads the caption to determine what
bitmaps to load. Now create four bitmaps and
add/import to your project one for each
state: button-up, button-down, button-focus
and button-disabled. Only button-up and
button-down are required; the other two are
optional. Once you have added/imported
these, change their IDs to the following (Important:
include the quotation marks):
"BUTTONU",
"BUTTOND",
"BUTTONF"
and
"BUTTONX".
Now in
the ClassView tab, right-click on
CMyDlgBar
and choose ADD MEMBER VARIABLE. Type
CBitmapButton
for Variable type and
m_bmButton
for Variable name; make it Protected. In the
MyDlgBar.cpp file in the
Create()
function, after the call to
base class, add this code:
   if(bReturn)
                m_bmButton.AutoLoad(IDC_BUTTON_BITMAP, this);
Again,
if you gave your button a different ID, you
will need to change the ID here. That's
it... now you have an owner-drawn
CBitmapButton.
The only thing left is to add a message
handler for the button.
Adding the Message Handler
Just
like any dialog bar, the messages must be
handled in either the MainFrame, Document or
View class. We will handle this one in the
View class. You must add your message
handlers manually. In your View class header
file, add a function declaration in the
message map section, like this:
protected:
afx_msg void OnButtonBitmap(); <---- ADD THIS LINE
DECLARE_MESSAGE_MAP()
};
Then
in the message map of your View class
*.cpp file, edit the code as follows:
BEGIN_MESSAGE_MAP(CDerivedDBView, CFormView)
ON_BN_CLICKED(IDC_BUTTON_BITMAP, OnButtonBitmap)
END_MESSAGE_MAP()
Now
you add your function implementation to the
bottom of your View class *.cpp
file:
void CDerivedDBView::OnButtonBitmap()
{
        CString msg = "You Clicked a CBitmapButton on a Dialog Bar       \n";
        msg += "in a CDialogBar derived class!                ";
        AfxMessageBox(msg);
}
One
last thing: at the top of your View class
*.cpp file, add the line:
#include "MyDlgBar.h"
That's
all there is to it. Compile, run and voila!,
you have a working
CBitmapButton
in your dialog bar.
This will also work with any custom control.
You can add an ActiveX control if you want.
For any control that you add that needs to
be initialized, subclassed, owner-drawn or
whatever, just do the initialization from
the
Create()
override function in MyDlgBar.cpp,
after the call to the base
class.
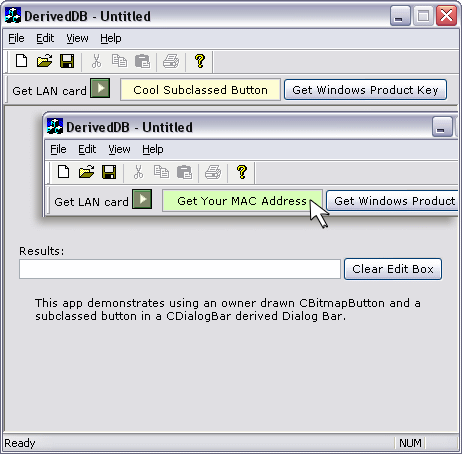
Example: The Subclassed Button Control
The
demo project includes a subclassed button
control in the
dialog bar.You can see his
article for instructions on deriving your
class. To subclass a button in the
dialog bar,
use his instructions for subclassing
existing items. Look at the MyDlgBar.h
and MyDlgBar.cpp files in the
sample project to see how this is
implemented. To use the sample class files,
just add NewButton.h and
NewButton.cpp to your project.
Now
drag a button onto your dialog bar and give
it an ID of
IDC_DBSUB_BUTTON.
Then simply add an
include
for NewButton.h in the
MyDlgBar.h file and add a member
variable of type
CNewButton
(i.e.
									CNewButton
									m_subButton
).
Then, in the
Create()
function of MyDlgBar.cpp (right
above or below the initialization code for
your
CBitmapButton),
add the line:
m_subButton.SubclassDlgItem(IDC_DBSUB_BUTTON, this);
Since
you have more than one instruction, be sure
to place brackets around your instructions
under the
if()
statement. Also note that we do not have to
specify the button as owner-drawn in the
resource editor. This is because we set up
our derived class (as per Chris's
instructions) to force all subclassed items
to be owner-drawn. That's it. Use your
imagination and you can work similar
customizations with any control in a dialog
bar.