It
demonstrates
how to
perform a
practical
.NET
programming
tucancode.net using
either C# or
Managed
C++
Extensions.
In a
previous
article,
"Managed
Extensions:
Using
GDI+
Brushes to
Draw Text,"
I presented
step-by-step
instructions
as well as a
demo
application
that
illustrated
how to
draw 2D
text
using
GDI+
objects.
This week, I
take it a
step further
and show you
how to
render 3D
text
to
accomplish
the
following
effects:
-
Shadowed
text
-
Blocked
text
-
Embossed
text
-
Engraved
text
The
shadowed,
blocked,
embossed, or
engraved
text effects
are
typically
realized by
drawing the
text
multiple
times,
starting
with the
text
furthest in
the
background (
the shadow)
and
proceeding
until the
top-most, or
foreground,
text. In
other words,
drawing
3D text
is basically
just drawing
2D text
multiple
times.
Therefore, I
won't
describe
each step of
setting up
the various
GDI+
objects as
I've already
done that in
the
article,
"Managed
Extensions:
Using
GDI+
Brushes to
Draw Text."
Instead,
I'll focus
on the code
necessary to
accomplish
each of the
aforementioned
3D effects.
Note:
To
test
these
code
snippets,
first
simply
drag a
PictureBox
from the
Toolbox
onto a
Form in
a
Managed
Extensions
Windows
Forms
application
and name
the
PictureBox
variable
picText.
Then,
copy and
paste
the
desired
snippet
into
your
application
to have
the text
rendered
onto the
PictureBox.
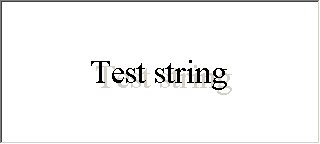
Steps to
Rendering
Shadowed
Text
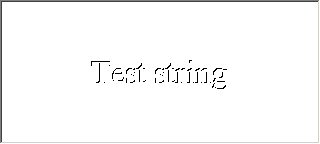
To achieve a
shadowed
appearance,
you simply
draw the
shadowed
text twice:
first at the
desired
depth and
then the
foreground
text. For
example, the
following
code draws
sample text
on a window
(represented
by the
Graphics
object, g)
where the
text has a
shadow
version of
itself drawn
five pixels
in the
background:
private:
System::Void picText_Paint(
System::Object * sender,
System::Windows::Forms::PaintEventArgs * e)
{
String* textToDisplay = S"Test string";
Graphics* g = e->Graphics;
System::Drawing::Font* font =
new System::Drawing::Font("Times New Roman",
Convert::ToSingle(25),
FontStyle::Regular);
SizeF textSize = g->MeasureString(textToDisplay, font);
Single x = (picText->Width - textSize.Width) / 2;
Single y = (picText->Height - textSize.Height) / 2;
g->Clear(Color::White);
g->DrawString(textToDisplay,
font,
SystemBrushes::ControlLight,
x + 5, y + 5);
g->DrawString(textToDisplay, font, SystemBrushes::ControlText,
x, y);
}
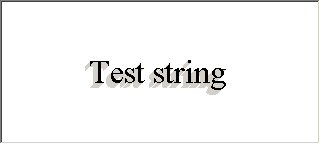
Steps to
Rendering
Blocked Text
To get the
blocked-text
effect,
repeatedly
draw the
text
starting at
the desired
depth and
moving one
pixel at a
time up to
the
foreground
text.
Obviously,
you have to
decide in
which
direction
this
repeated
drawing
occurs. I
personally
draw blocked
text with
the light
source from
the upper
right. This
means using
a for
loop and
subtracting
the offset
depth from
the X
dimension.
To move the
light source
to the upper
left, simply
increment
the offset:
private:
System::Void picText_Paint(
System::Object * sender,
System::Windows::Forms::PaintEventArgs * e)
{
String* textToDisplay = S"Test string";
Graphics* g = e->Graphics;
System::Drawing::Font* font = new System::Drawing::
Font("Times New Roman",
Convert::ToSingle(25),
FontStyle::Regular);
SizeF textSize = g->MeasureString(textToDisplay, font);
Single x = (picText->Width - textSize.Width) / 2;
Single y = (picText->Height - textSize.Height) / 2;
g->Clear(Color::White);
for (int i = Convert::ToInt32(5); i >= 0; i--)
{
g->DrawString(textToDisplay,
font,
SystemBrushes::ControlLight,
x - i, y + i);
}
g->DrawString(textToDisplay, font, SystemBrushes::ControlText,
x, y);
}
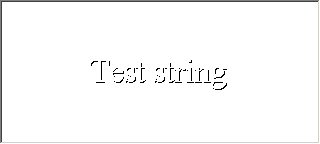
Steps for
Rendering
Embossed and
Engraved
Text
I explain
both of
these in the
same section
because
engraved
text is
merely the
inverse of
embossed
text. The
embossed-text
effect is
usually
accomplished
by simply
using the
shadow-text
technique
with the
depth set at
one pixel
and the
foreground
text color
set to the
same color
as the
background
on which the
text is
being
rendered.
The shadow
text is then
some darker
color, such
as grey or
black. The
engraved
effect is
done in
reverse; the
offset for
the shadow
color is one
pixel up and
left from
the
foreground
text:
private:
System::Void picText_Paint(
System::Object * sender,
System::Windows::Forms::PaintEventArgs * e)
{
String* textToDisplay = S"Test string";
Graphics* g = e->Graphics;
System::Drawing::Font* font = new System::Drawing::
Font("Times New Roman", Convert::ToSingle(25),
FontStyle::Regular);
SizeF textSize = g->MeasureString(textToDisplay, font);
Single x = (picText->Width - textSize.Width) / 2;
Single y = (picText->Height - textSize.Height) / 2;
g->Clear(Color::White);
bool isEmbossed = false;
g->DrawString(textToDisplay,
font,
SystemBrushes::ControlText,
x + Convert::ToSingle( (isEmbossed? 1 : -1)),
y + Convert::ToSingle( (isEmbossed ? 1 : -1)));
g->DrawString(textToDisplay, font, new SolidBrush(Color::White),
x, y);
}
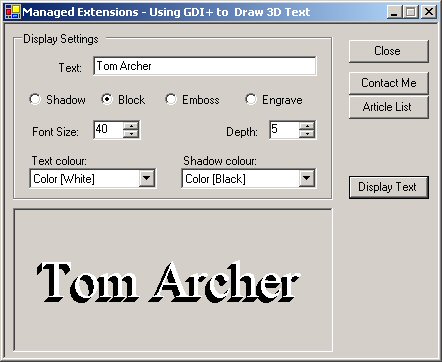
Sample
Application
I've
attached a
demo
application
that allows
you to play
around with
the various
effects you
can
accomplish
with
GDI+
and
3D text.
The
following
image is a
screen
capture of
that demo
application:
About the
Author
I am a
Program
Manager and
Content
Strategist
for the
Microsoft
MSDN Online
team
managing the
Windows
Vista and
Visual
C++
developer
centers.
Before being
employed at
Microsoft, I
was awarded
MVP status
for the
Visual
C++
product. A
20+ year
veteran of
programming
with various
languages -
C++, C,
Assembler,
RPG III/400,
PL/I, etc. -
I've also
written many
technical
books
(Inside C#,
Extending
MFC
Applications
with the
.NET
Framework,
Visual
C++.NET
Bible, etc.)
and 100+
online
articles.
Downloads
GDIPlus3DText.zip
- Download
source
code
- 56 Kb